I've been trying to get a complete Pizza post up, and have failed miserably. I made pizza on Friday the 13th and filmed it all with my digital camera. The video quality is atrocious. Maybe it's time to upgrade that camera...
I do have an HD video camera, so next time I make pizza--probably this Friday night--I'll re-record the entire process for you all. I will cover everything from making the dough and the sauce to that first bite.
My daughter's playing softball, and that seems to occupy at least two nights every week as well as the entire day on Saturday. My wife's on her summer schedule, so she's working two nights a week. In short, the amount of time I have to spend having fun in the kitchen with a camera and my laptop is dwindling. I will try to keep posting throughout the summer but don't expect a new article every week.
So for now, a few food-related thoughts for the week.
I have discovered the beauty of boneless skinless chicken thighs. Mostly thanks to Mark Bittman whose series of short cooking videos The Minimalist are excellent. In particular, I tried his 15 Minute Herbed Chicken recently and it was both simple and delicious. If you are wondering what to cook for dinner some night, check out his videos. Most are under five minutes and every one I've tried has been delicious.
If you don't already, try shopping at some ethnic grocery stores. Even in my small town we have a Mexican grocery, and nearly every town of any size has an Asian grocery or ten. If you can find an Indian grocery store in your area, check it out. They've got all kinds of foods you've probably never tried, and that means lots of chances to try new things. Always try new foods. You never know when you'll find the best thing you've never tasted.
Grilling season is coming, and I've got to say that I'm a big fan of lump charcoal. If you're a propane griller, consider making your next grill a charcoal burner. If you use a charcoal chimney to start your coals the wait time is really not long at all and the flavor is worth the wait. One thing I'll definitely post this summer is grilled oysters. If you're lucky enough to live where live oysters are available and affordable, an evening of grilling oysters is about as good as it gets.
Tuesday, May 24, 2011


Friday, May 13, 2011
Quiche!
As promised, I've made a quiche. If you're old enough to remember when the book Real Men Don't Eat Quiche came out, there's a chance you've never eaten the stuff. If you're too young to remember those days, the chances are even better you've never had quiche. This is a travesty.
For starters, the most famous quiche of all, Quiche Lorraine, is about as manly as food gets. It's eggs, heavy cream, bacon, cheese and a little bit of onion. Doesn't that sound delicious already? Even better, it's baked and looks like a pie. It's in a pie crust that, in a perfect world, would be made with lard. That's right. LARD. What could be more manly that bacon, eggs and cheese in a lard-based crust?
Sadly, I did not take the time to make my own pie crust. I used a frozen crust. Sue me. They're cheap, they're better than most homemade crusts, and they're very convenient.
My wife has a pie crust recipe that is fantastic. I'm not kidding. This is Blue Ribbon Pie Crust. Literally.
The recipe's written down around here somewhere but if I published it I would become Public Enemy Number One in short order. This is a recipe that's been handed down for at least three generations and is not for sharing. I'm not a "secret recipe" kind of guy. I'd tell you how to make anything I know how to make. Even my professional chef brothers seem perfectly willing to share any and every recipe and technique they've got. Maybe it's a woman thing. In any case, this cheap frozen crust worked great.

You can find an endless number of quiche recipes online. Mine is no revelation. Really, it's the concept that counts. Don't get the wrong perception, while Quiche Lorraine might not be the most health-conscious dish you've ever had, quiche does not have to be the least healthy dish in your repertoire. You can find quiche recipes that use loads of spinach, no egg yolks, and no heavy cream. They won't be as rich and delicious as the real thing, but it can be done.
The first quiche recipe I ever used was from the good old Betty Crocker cookbook. It called for four eggs and two cups of heavy cream. For me, with an egg:cream ratio like that it's more like a savory egg custard pie than a quiche. It's delicious, but I prefer a closer to 50:50 egg:cream mixture.
I call this Quiche American. Basically, it's Quiche Lorraine with Tillamook Medium Cheddar instead of Swiss cheese.
Ingredients:
1/2 lb. Bacon, cooked crispy and crumbled
1/4 lb. Cheddar Cheese, finely grated
1/2 cup finely chopped onion
5 eggs
1 1/4 cups heavy cream
Salt & pepper
Cook the bacon.

You want it pretty crispy. Certainly much more done than I prefer when eating it on its own with a fried egg or on a BLT.
Shred the cheese while the bacon cooks. In keeping with the spirit of Chop Your Own, buy block cheese and grate it yourself. This is a rule. Shredded cheese has anti-caking agents that tend to mess with melting properties. I won't lie and say I never buy shredded cheese, but I do shred my own cheese as much as I can.

Chop the onion. The one-half cup measurement is a guess. See the picture. Use more or less according to taste. As my brother Pete once told me with regard to his French Onion Soup recipe, "Use your brain. It's not all in the recipe."

Crumble the bacon into the pie crust.

Put the eggs into a mixing bowl and whisk lightly. Add the cream. Mix a little, but not much. Be careful - you don't want whipped cream. Season with salt & pepper.

I know, there are only four eggs in the bowl. I thought that four eggs and 1 C. cream would be enough. It wasn't I ended up whisking another egg and 1/4 C. of cream and adding it to the crust after I realized I needed more liquid.
Add the cheese and onion, then pour the egg/cream mixture over the top.

You're going to bake this at 375 for about 45 minutes. Put a cookie sheet under your pie crust just in case. You don't want this stuff burning on the bottom of your oven.
The finished product:

Yes, it is delicious.
It makes an excellent breakfast the next day, too. Some folks eat it cold but we usually heat it for 45 seconds or so in the microwave. You can even freeze individual slices (wrapped tightly) for next week. It won't freeze well long term.
I'm going to try to take some pics this evening as I make pizza...
For starters, the most famous quiche of all, Quiche Lorraine, is about as manly as food gets. It's eggs, heavy cream, bacon, cheese and a little bit of onion. Doesn't that sound delicious already? Even better, it's baked and looks like a pie. It's in a pie crust that, in a perfect world, would be made with lard. That's right. LARD. What could be more manly that bacon, eggs and cheese in a lard-based crust?
Sadly, I did not take the time to make my own pie crust. I used a frozen crust. Sue me. They're cheap, they're better than most homemade crusts, and they're very convenient.
My wife has a pie crust recipe that is fantastic. I'm not kidding. This is Blue Ribbon Pie Crust. Literally.
The recipe's written down around here somewhere but if I published it I would become Public Enemy Number One in short order. This is a recipe that's been handed down for at least three generations and is not for sharing. I'm not a "secret recipe" kind of guy. I'd tell you how to make anything I know how to make. Even my professional chef brothers seem perfectly willing to share any and every recipe and technique they've got. Maybe it's a woman thing. In any case, this cheap frozen crust worked great.

You can find an endless number of quiche recipes online. Mine is no revelation. Really, it's the concept that counts. Don't get the wrong perception, while Quiche Lorraine might not be the most health-conscious dish you've ever had, quiche does not have to be the least healthy dish in your repertoire. You can find quiche recipes that use loads of spinach, no egg yolks, and no heavy cream. They won't be as rich and delicious as the real thing, but it can be done.
The first quiche recipe I ever used was from the good old Betty Crocker cookbook. It called for four eggs and two cups of heavy cream. For me, with an egg:cream ratio like that it's more like a savory egg custard pie than a quiche. It's delicious, but I prefer a closer to 50:50 egg:cream mixture.
I call this Quiche American. Basically, it's Quiche Lorraine with Tillamook Medium Cheddar instead of Swiss cheese.
Ingredients:
1/2 lb. Bacon, cooked crispy and crumbled
1/4 lb. Cheddar Cheese, finely grated
1/2 cup finely chopped onion
5 eggs
1 1/4 cups heavy cream
Salt & pepper
Cook the bacon.

You want it pretty crispy. Certainly much more done than I prefer when eating it on its own with a fried egg or on a BLT.
Shred the cheese while the bacon cooks. In keeping with the spirit of Chop Your Own, buy block cheese and grate it yourself. This is a rule. Shredded cheese has anti-caking agents that tend to mess with melting properties. I won't lie and say I never buy shredded cheese, but I do shred my own cheese as much as I can.

Chop the onion. The one-half cup measurement is a guess. See the picture. Use more or less according to taste. As my brother Pete once told me with regard to his French Onion Soup recipe, "Use your brain. It's not all in the recipe."

Crumble the bacon into the pie crust.

Put the eggs into a mixing bowl and whisk lightly. Add the cream. Mix a little, but not much. Be careful - you don't want whipped cream. Season with salt & pepper.

I know, there are only four eggs in the bowl. I thought that four eggs and 1 C. cream would be enough. It wasn't I ended up whisking another egg and 1/4 C. of cream and adding it to the crust after I realized I needed more liquid.
Add the cheese and onion, then pour the egg/cream mixture over the top.

You're going to bake this at 375 for about 45 minutes. Put a cookie sheet under your pie crust just in case. You don't want this stuff burning on the bottom of your oven.
The finished product:

Yes, it is delicious.
It makes an excellent breakfast the next day, too. Some folks eat it cold but we usually heat it for 45 seconds or so in the microwave. You can even freeze individual slices (wrapped tightly) for next week. It won't freeze well long term.
I'm going to try to take some pics this evening as I make pizza...
Wednesday, April 27, 2011
Assorted Ramblings on a Variety of Topics
My father follows this blog, and he pointed out that I have neglected dessert here. He's got a point, but I'm not sure what to do about it. I don't often prepare many desserts more complicated than topping some ice cream, and I'm trying to lose weight right now and I'm not really eating sugar. Given those two facts, it's unlikely that you'll see any great dessert tips here anytime soon. Maybe when I get down to 200 pounds I'll post up my recipe for Shoo Fly Pie. I took several recipes, some that I got from family and others that I found online and did some major experimentation. It took me almost ten pies to get one that I thought was perfect. Maybe those ten pies are part of the reason I'm trying to lose weight now.
Last week I talked about eggs, and I have plenty more where that came from. My next blog post will be a quiche. Quiche is awesome for a variety of reasons. If you're willing to start with a frozen crust (and I usually am) they are incredibly simple to prepare. They're also delicious and you can put almost anything in them. I'll try to buy some pie crusts today...
It's spring, and for a lot of people that means fishing season. If you're not an angler, you should consider it. If you are an angler, get out there! I've been too busy to fish much these last few years and that needs to change. Fishing is a great way to relax, spend time with your family, and maybe even bring home something fresh and delicious. I'm not going to turn this into a fishing blog, but if it's been a few years since you wet a line, maybe this spring would be a good time to get back out on the water and try to catch yourself a delicious dinner.
Friday night is Pizza Night at my house, and most weeks we make our own from scratch. I use the basic dough recipe found here: Garlic Bread, sometimes with a few tablespoons of oregano mixed into the dough, a simple pizza sauce and whole milk mozzarella cheese that I buy in huge blocks and shred at home. FYI - that dough recipe should make two thin crust pizzas.
Pizza sauce:
Olive Oil
Garlic
Oregano
Red Pepper Flakes
Salt & Pepper
Tomato Sauce
Start with a medium sauce pan over medium heat. Add enough oil to thinly coat the bottom of the pan - two or three tablespoons, I guess. When the oil is hot, add your garlic, oregano, red pepper flakes, salt & pepper to taste. I like a lot of garlic. Three or four cloves of freshly chopped garlic is best. A good amount of oregano is good too, probably a rounded tablespoon or so.
The garlic will cook really quickly, and as soon as it starts turning brown around the edges add your tomato sauce. Stir well, reduce heat and bring to a boil. It's done once it boils. One large can of tomato sauce is usually enough to make four pizzas, so plan on freezing half of it for next week.
If you want a thicker sauce, add some tomato paste or use crushed tomatoes instead of tomato sauce.
We make pizza every Friday, so I'll get some pics up this weekend.
Last week I talked about eggs, and I have plenty more where that came from. My next blog post will be a quiche. Quiche is awesome for a variety of reasons. If you're willing to start with a frozen crust (and I usually am) they are incredibly simple to prepare. They're also delicious and you can put almost anything in them. I'll try to buy some pie crusts today...
It's spring, and for a lot of people that means fishing season. If you're not an angler, you should consider it. If you are an angler, get out there! I've been too busy to fish much these last few years and that needs to change. Fishing is a great way to relax, spend time with your family, and maybe even bring home something fresh and delicious. I'm not going to turn this into a fishing blog, but if it's been a few years since you wet a line, maybe this spring would be a good time to get back out on the water and try to catch yourself a delicious dinner.
Friday night is Pizza Night at my house, and most weeks we make our own from scratch. I use the basic dough recipe found here: Garlic Bread, sometimes with a few tablespoons of oregano mixed into the dough, a simple pizza sauce and whole milk mozzarella cheese that I buy in huge blocks and shred at home. FYI - that dough recipe should make two thin crust pizzas.
Pizza sauce:
Olive Oil
Garlic
Oregano
Red Pepper Flakes
Salt & Pepper
Tomato Sauce
Start with a medium sauce pan over medium heat. Add enough oil to thinly coat the bottom of the pan - two or three tablespoons, I guess. When the oil is hot, add your garlic, oregano, red pepper flakes, salt & pepper to taste. I like a lot of garlic. Three or four cloves of freshly chopped garlic is best. A good amount of oregano is good too, probably a rounded tablespoon or so.
The garlic will cook really quickly, and as soon as it starts turning brown around the edges add your tomato sauce. Stir well, reduce heat and bring to a boil. It's done once it boils. One large can of tomato sauce is usually enough to make four pizzas, so plan on freezing half of it for next week.
If you want a thicker sauce, add some tomato paste or use crushed tomatoes instead of tomato sauce.
We make pizza every Friday, so I'll get some pics up this weekend.
Tuesday, April 12, 2011
Eggs! They're not just for breakfast anymore.
I love eggs. A simple hard-boiled egg with a sprinkle of salt is about as good as it gets for me. I like eggs just about every way imaginable. Fried, scrambled, sunny side up, poached, soft boiled, whatever. Omelets, custards, huevos rancheros, sauces, you name it. I just love eggs.
Eggs don't have to be limited to breakfast, and I'm not talking about an egg salad sandwich for lunch.
One of my favorite pasta dishes is Pasta Carbonara. You can find an endless number of Carbonara recipes in cookbooks and online and there will be quite a lot of variation in them. My version is exceptionally simple, which is a good thing. It's also easily scaled from a single serving to a meal for eight or more.
For each serving, you'll need:
Pasta. Something long and thin. Spaghetti, linguine, fettuccine, that kind of thing. I usually use linguine.
1 egg per person
2-3 strips of bacon per person (thick cut? 2, thinner slices? 3)
Hard cheese. I love Romano. My wife loves Parmigiano Reggiano. Maybe you love Asiago. Whatever you prefer, just be sure to buy it in a block and grate it yourself.
Fresh ground black pepper.
Get your pasta water on first, then chop the bacon into small pieces. I'll usually split the strips lengthwise then cut into quarter-inch pieces. While the water heats up, start frying the bacon.
You'll probably see the water boil before the bacon is done. Salt your water liberally before you add the noodles. Add the noodles and keep an eye on your bacon.
The bacon should be cooked before the noodles are done. Turn off the burner and let the bacon sit. Do not drain the bacon grease, some or all of it is going into the dish.
When the noodles are done, strain them and return them to the pasta pot. Add the bacon and stir. If you're freaked out by all that bacon grease, don't add it all. For the full effect, use it all.
Crack your eggs into the hot pasta & bacon and give it a good stir. The heat from the noodles will cook the egg and make the bacon stick to the noodles.
Plate immediately. Top with fresh grated cheese and fresh ground pepper to taste.
Eggs don't have to be limited to breakfast, and I'm not talking about an egg salad sandwich for lunch.
One of my favorite pasta dishes is Pasta Carbonara. You can find an endless number of Carbonara recipes in cookbooks and online and there will be quite a lot of variation in them. My version is exceptionally simple, which is a good thing. It's also easily scaled from a single serving to a meal for eight or more.
For each serving, you'll need:
Pasta. Something long and thin. Spaghetti, linguine, fettuccine, that kind of thing. I usually use linguine.
1 egg per person
2-3 strips of bacon per person (thick cut? 2, thinner slices? 3)
Hard cheese. I love Romano. My wife loves Parmigiano Reggiano. Maybe you love Asiago. Whatever you prefer, just be sure to buy it in a block and grate it yourself.
Fresh ground black pepper.
Get your pasta water on first, then chop the bacon into small pieces. I'll usually split the strips lengthwise then cut into quarter-inch pieces. While the water heats up, start frying the bacon.
You'll probably see the water boil before the bacon is done. Salt your water liberally before you add the noodles. Add the noodles and keep an eye on your bacon.
The bacon should be cooked before the noodles are done. Turn off the burner and let the bacon sit. Do not drain the bacon grease, some or all of it is going into the dish.
When the noodles are done, strain them and return them to the pasta pot. Add the bacon and stir. If you're freaked out by all that bacon grease, don't add it all. For the full effect, use it all.
Crack your eggs into the hot pasta & bacon and give it a good stir. The heat from the noodles will cook the egg and make the bacon stick to the noodles.
Plate immediately. Top with fresh grated cheese and fresh ground pepper to taste.
Tuesday, March 22, 2011
Sometimes a Technique is Better Than a Recipe
Sorry, no time for any amusing tales of poverty or anecdotes this morning.
Crispy Fish. Sounds good already doesn't it? Even better, it's not deep fried. I learned this technique from my brother and have used it with several varieties of fish and it has always been delicious. It's quick, easy and delicious. What's not to love about that?
Start with skinless fillets of whatever fish you like, no more than about 1" thick. Around 3/4" thick is ideal, but even a thin 1/2" fillet can be used. Brush both sides of the fillet with oil and season with salt & pepper. A coarse kosher or sea salt is best, and as always you should be grinding your own pepper. Cut a lemon in half length wise. Cut one half into four wedges and reserve the other half for finishing the fish in the pan.
Place your skillet on medium-high heat, add a little oil. When the pan is hot, place the fish in the pan. If you can identify the skin side of your skinless fillet, place that side down. If you're working with a fillet from a larger fish and can't identify the skin side, don't worry about it.
DO NOT FLIP THE FISH. You will be able to watch the fish cook from the bottom, and you won't want to flip it at all unless you absolutely have to. It won't take any more than a few minutes for the fish to cook. If you're using a particularly thick piece of fish and it's going to burn before it's done, flip it as late as possible.
When the fish is done, finish it in the pan with the juice of the reserved half-lemon. Remove the fillets and place them crispy side up on plates. Serve with a lemon wedge or two.
This fish is as comfortable next to mac & cheese and red beets as it would be with roasted garlic smashed potatoes and peeled asparagus.
I've used local Rockfish, cheap frozen Tilapia, fresh caught Salmon and Steelhead and even Pacific Cod. They all turned out great, and I honestly think that any fish will be delicious when done this way.
Crispy Fish. Sounds good already doesn't it? Even better, it's not deep fried. I learned this technique from my brother and have used it with several varieties of fish and it has always been delicious. It's quick, easy and delicious. What's not to love about that?
Start with skinless fillets of whatever fish you like, no more than about 1" thick. Around 3/4" thick is ideal, but even a thin 1/2" fillet can be used. Brush both sides of the fillet with oil and season with salt & pepper. A coarse kosher or sea salt is best, and as always you should be grinding your own pepper. Cut a lemon in half length wise. Cut one half into four wedges and reserve the other half for finishing the fish in the pan.
Place your skillet on medium-high heat, add a little oil. When the pan is hot, place the fish in the pan. If you can identify the skin side of your skinless fillet, place that side down. If you're working with a fillet from a larger fish and can't identify the skin side, don't worry about it.
DO NOT FLIP THE FISH. You will be able to watch the fish cook from the bottom, and you won't want to flip it at all unless you absolutely have to. It won't take any more than a few minutes for the fish to cook. If you're using a particularly thick piece of fish and it's going to burn before it's done, flip it as late as possible.
When the fish is done, finish it in the pan with the juice of the reserved half-lemon. Remove the fillets and place them crispy side up on plates. Serve with a lemon wedge or two.
This fish is as comfortable next to mac & cheese and red beets as it would be with roasted garlic smashed potatoes and peeled asparagus.
I've used local Rockfish, cheap frozen Tilapia, fresh caught Salmon and Steelhead and even Pacific Cod. They all turned out great, and I honestly think that any fish will be delicious when done this way.
Wednesday, March 16, 2011
Trash or Treasure? Don't Throw Away That Chicken!
You know those $5.99 roast chickens at the grocery store? I love those things. With a family of three we can usually eat two meals off of one bird and make chicken stock from the carcass that gets used for all sorts of things.
For the single person, you can feed yourself at least 3-4 times off of one bird.
Meal #1 - breast/wing quarter w/starch and veggies as your evening meal.
Meal #2 - lunch the next day. Either eat the other breast/wing quarter whole for lunch (cold or reheated) or chop up the breast and make a chicken salad sandwich. Slice it up and put it on top of a salad. Cut it up and make a cold wrap out of it. Your options are limited only by your imagination and your budget.
Now you have two leg/thigh quarters left in your refrigerator. Take them out, remove the skin and use a fork to shred them. Turn them into chicken tacos/burrito/nachos by heating in a pan with a little oil and some taco seasoning.
If you prefer dark meat, reverse the roles of the breast/wing and leg/thigh quarters.
The carcass can be turned into chicken stock if you're up to it. Simply place the carcass in a large pot and cover with cold water. Add some onion, celery, carrot, a little salt & pepper and maybe some parsley, garlic or bay leaf. Bring it to a boil then reduce to a simmer for a few hours. Remove the carcass and strain. If you want to reduce the stock for a more concentrated flavor, just simmer away uncovered until you get the flavor you want. Once cooled, you can remove any fat and freeze in zip-top bags or even in an ice cube tray. If you use a tray, remove and bag the cubes once frozen. Obviously, if you're eating one of these every week, you're not going to need to make stock out of every carcass.
I'll try to come up with a recipe or ten that utilize this chicken stock in future posts.
In the meantime, don't throw away that chicken!
PS. The next time we buy one of these things, I'll add some images to this post.
For the single person, you can feed yourself at least 3-4 times off of one bird.
Meal #1 - breast/wing quarter w/starch and veggies as your evening meal.
Meal #2 - lunch the next day. Either eat the other breast/wing quarter whole for lunch (cold or reheated) or chop up the breast and make a chicken salad sandwich. Slice it up and put it on top of a salad. Cut it up and make a cold wrap out of it. Your options are limited only by your imagination and your budget.
Now you have two leg/thigh quarters left in your refrigerator. Take them out, remove the skin and use a fork to shred them. Turn them into chicken tacos/burrito/nachos by heating in a pan with a little oil and some taco seasoning.
If you prefer dark meat, reverse the roles of the breast/wing and leg/thigh quarters.
The carcass can be turned into chicken stock if you're up to it. Simply place the carcass in a large pot and cover with cold water. Add some onion, celery, carrot, a little salt & pepper and maybe some parsley, garlic or bay leaf. Bring it to a boil then reduce to a simmer for a few hours. Remove the carcass and strain. If you want to reduce the stock for a more concentrated flavor, just simmer away uncovered until you get the flavor you want. Once cooled, you can remove any fat and freeze in zip-top bags or even in an ice cube tray. If you use a tray, remove and bag the cubes once frozen. Obviously, if you're eating one of these every week, you're not going to need to make stock out of every carcass.
I'll try to come up with a recipe or ten that utilize this chicken stock in future posts.
In the meantime, don't throw away that chicken!
PS. The next time we buy one of these things, I'll add some images to this post.
Monday, March 14, 2011
Don't Let Anyone Chop Your Garlic
In the summer of 1993 I went to Naknek, Alaska to look for a job on a fishing boat. I found one, but I stepped into an open fish hold less than a week into the season. Hello sprained knee, goodbye fishing job. I went back to Homer and got a job at the local record store. By the time the spring of ’94 rolled around I was managing the place. I loved that job. I got engaged. Kmart opened a store 60 miles up the road in Kenai and sales dropped by a third almost overnight. It wasn’t long before I was an unemployed newlywed. Ugh.
I found part-time work over Christmas at the local kitchen store. It was in the same shopping center as the music store, so I knew the ladies that ran the place. It was six weeks of work when I desperately needed it and I really enjoyed it. As a Christmas gift, they gave me a copy of Donaldo Soviero’s cookbook La Vera Cucina Italiana: The Fundamentals of Classic Italian Cooking. To this day it’s still my favorite cookbook. It’s a fun book to read, even if you don’t use many of the recipes. I’m pretty sure the book is out of print now.
If you cook much at all, you’ll soon find that you tend to tailor your favorite recipes to your particular tastes—or simply modify them due to a lack or surplus of a particular ingredient. In the case of the recipe below, I started with a recipe from the aforementioned cookbook and did the best I could with what I had at the time. I skipped entire steps, I experimented with the garlic preparation, I let the dough rise a second time. I’ve made this stuff so many times now that I don’t even look at the cookbook anymore. The difference between what I make and what the author intended is enough to make me want to really try to follow the recipe to the letter—but I never have, not even once.
This recipe doesn’t really fit particularly well with my “cooking for one” motif but it’s so good I just had to write it up. It’s an excellent special occasion bread for when you’re having a few friends over for any kind of Italian dinner.
Very Garlic Bread
Synopsis & timeline:
1. Preheat oven to 400 degrees
2. Prepare garlic bulb(s) for roasting, place in oven
3. Make dough
4. While dough rises and garlic roasts, work on some other part of your meal.
5. Remove garlic from oven
6. Punch down risen dough and form loaf
7. Bake finished loaf
Preheat your oven to 400 degrees. If you have a pizza stone, use it. Preheat the oven with the stone inside. If you don’t have a pizza stone, use a cookie sheet. You don’t need to preheat the cookie sheet.
Roasting Garlic
My favorite way to do this loaf is to roast the garlic in the oven. You’ll need at least one entire bulb of garlic, two if they are small. In the end you want at least sixteen whole roasted cloves. Don’t worry about any extra going to waste. It won’t. Reserve any oil used in the roasting process.
You can find plenty of “recipes” for roasting garlic online but really it’s just a matter of chopping off the bottom of a bulb of garlic, placing it cut-side-up in/on an oven safe dish, drizzling it with olive oil and baking it (covered) until the cloves are soft. I usually go with a 400 degree oven and 35-40 minutes, more or less. I usually reserve the tips for chopping—if I’m making garlic bread it’s usually as an accompaniment to a pasta dish, and there’s usually some chopped garlic in my pasta dishes. For this recipe, you might roast your garlic a little rare, since you’ll be baking it again inside the loaf.
Alternately, you can “roast” the garlic on the stove top. Take sixteen (or twenty) unpeeled cloves of garlic and put them in the smallest pan you have. Add enough olive oil to cover about halfway and cook over medium-low heat until the garlic is done—probably ten minutes or so. Remove from heat, remove cloves from oil and allow to cool. Reserve the oil. Once the cloves are cool enough to handle, peel them.
Once you have the garlic in the oven, it’s time to start making the dough.


Basic Dough
I use this same recipe for pizza dough. It’s about as simple a bread dough recipe as you’ll find.
Ingredients:
1 C warm water
3 C flour + flour for dusting
1 pkg active yeast (or equivalent)
Olive Oil
In a large mixing bowl, add the yeast to the warm water and stir to dissolve. If you’re in a hurry, add a pinch of sugar. Add flour one cup at a time and mix with a wooden spoon until well mixed between each cup. It will be difficult if not impossible to incorporate all of the flour with just the spoon. If you’d like, you can add some dried oregano or some finely chopped garlic to the dough after the first cup of flour.


Flour your work surface liberally and get the dough out of the bowl. Flour your hands. Knead by hand until the dough is smooth and bounces back nicely if you poke it with a finger. If you’ve never kneaded dough before, form the dough into a thick disc, fold about 1/3 over, push away with the heel of your hand, rotate 90 degrees, fold, push, rotate, etc. Add flour anytime the dough seems wet. It will take a few minutes of constant kneading to get the dough smooth and ready to rise. Form the dough into a ball and pinch the bottom together so it’s nice and seamless.

Leave the dough on the counter, wash and dry your mixing bowl, pour a tablespoon or so of oil into the bottom of the bowl. Roll the ball in the oil to coat the entire surface. Cover the bowl with a towel and set in a warm place to rise for 20-30 minutes.


Don’t bother cleaning up the floured surface—you’re going to need it again shortly.
Hint: a little less flour or more water and/or a longer rise time will give you a less dense finished product. If the 1:3 water:flour ratio yields a bread that’s too dense for your taste, try adding a little more water or using a little less flour. With practice you really do get a feel for working with dough.
Form Your Loaf:
16 cloves garlic, either roasted or unpeeled (see recipe)
Salt & pepper to taste
Crushed red pepper (optional)
The oven’s already at 400 degrees. Roll the risen dough onto your floured surface. Flour your hands and knead the dough again. If will get smaller and really stretchy in no time at all. Form into a disk about ¾ to 1 inch thick. It should be about 8” in diameter. Move the newly formed loaf to your cookie sheet or whatever you use to transfer stuff to your pizza stone. If you have a pizza peel, great, use it. If you use the back of a cookie sheet like I do, just as great. If you are cooking the bread on a cookie sheet, sprinkle the cookie sheet with corn meal or cover with parchment paper to prevent sticking.

Use your finger to poke 16 holes in the top of the loaf in a 4x4 pattern. If you like more garlic and you have it already roasted, poke the loaf a few more times. You don’t want to poke completely through the dough. Insert a clove of roasted garlic into each hole. Let the dough rise until it’s nearly doubled in thickness. It will practically swallow the cloves of garlic. Brush the entire loaf with the reserved oil from roasting the garlic. If you don’t have a brush, just pour it on there. Don’t be bashful. Season the entire loaf liberally with salt and pepper. Add a light sprinkle of crushed red pepper if you’re into that sort of thing. I like it peppery and very salty.


Now it’s time to bake your bread. If you’re using a pizza stone and no parchment paper, sprinkle the pizza stone with corn meal. If you have a pizza stone and use it regularly, you probably know the drill. Bake until the loaf is a nice golden brown, usually 20-25 minutes.

Time to eat!

If my wife had her way, this loaf would have fifty cloves of garlic in it. How much garlic you use is up to you. If the loaf in the pictures, I used twenty cloves. You might be able to tell from the picture of the unbaked loaf that some of the cloves are more done than others—the cloves in the center of the bulb are less done than those on the edges.
I've sliced this bread several ways. Usually I cut individual squares around every clove of garlic. Once in a while I'll cut it into eight wedges like a pizza. For this picture, I sliced across the entire loaf so you could see what it looks like inside. I would not recommend trying to cut slices to serve to people.
My next post will be very different from these first two. I’m going back to the “cooking for one” theme and espousing the wondrous potential of those $5.99 roasted chickens at your grocery store.
I found part-time work over Christmas at the local kitchen store. It was in the same shopping center as the music store, so I knew the ladies that ran the place. It was six weeks of work when I desperately needed it and I really enjoyed it. As a Christmas gift, they gave me a copy of Donaldo Soviero’s cookbook La Vera Cucina Italiana: The Fundamentals of Classic Italian Cooking. To this day it’s still my favorite cookbook. It’s a fun book to read, even if you don’t use many of the recipes. I’m pretty sure the book is out of print now.
If you cook much at all, you’ll soon find that you tend to tailor your favorite recipes to your particular tastes—or simply modify them due to a lack or surplus of a particular ingredient. In the case of the recipe below, I started with a recipe from the aforementioned cookbook and did the best I could with what I had at the time. I skipped entire steps, I experimented with the garlic preparation, I let the dough rise a second time. I’ve made this stuff so many times now that I don’t even look at the cookbook anymore. The difference between what I make and what the author intended is enough to make me want to really try to follow the recipe to the letter—but I never have, not even once.
This recipe doesn’t really fit particularly well with my “cooking for one” motif but it’s so good I just had to write it up. It’s an excellent special occasion bread for when you’re having a few friends over for any kind of Italian dinner.
Very Garlic Bread
Synopsis & timeline:
1. Preheat oven to 400 degrees
2. Prepare garlic bulb(s) for roasting, place in oven
3. Make dough
4. While dough rises and garlic roasts, work on some other part of your meal.
5. Remove garlic from oven
6. Punch down risen dough and form loaf
7. Bake finished loaf
Preheat your oven to 400 degrees. If you have a pizza stone, use it. Preheat the oven with the stone inside. If you don’t have a pizza stone, use a cookie sheet. You don’t need to preheat the cookie sheet.
Roasting Garlic
My favorite way to do this loaf is to roast the garlic in the oven. You’ll need at least one entire bulb of garlic, two if they are small. In the end you want at least sixteen whole roasted cloves. Don’t worry about any extra going to waste. It won’t. Reserve any oil used in the roasting process.
You can find plenty of “recipes” for roasting garlic online but really it’s just a matter of chopping off the bottom of a bulb of garlic, placing it cut-side-up in/on an oven safe dish, drizzling it with olive oil and baking it (covered) until the cloves are soft. I usually go with a 400 degree oven and 35-40 minutes, more or less. I usually reserve the tips for chopping—if I’m making garlic bread it’s usually as an accompaniment to a pasta dish, and there’s usually some chopped garlic in my pasta dishes. For this recipe, you might roast your garlic a little rare, since you’ll be baking it again inside the loaf.
Alternately, you can “roast” the garlic on the stove top. Take sixteen (or twenty) unpeeled cloves of garlic and put them in the smallest pan you have. Add enough olive oil to cover about halfway and cook over medium-low heat until the garlic is done—probably ten minutes or so. Remove from heat, remove cloves from oil and allow to cool. Reserve the oil. Once the cloves are cool enough to handle, peel them.
Once you have the garlic in the oven, it’s time to start making the dough.

Garlic bulbs mostly peeled and ready for some oil and some heat.

Garlic "tips" that can be saved and chopped for whatever purpose.

Roasted garlic just out of the oven

Oil from roasting garlic. Save this stuff!
Basic Dough
I use this same recipe for pizza dough. It’s about as simple a bread dough recipe as you’ll find.
Ingredients:
1 C warm water
3 C flour + flour for dusting
1 pkg active yeast (or equivalent)
Olive Oil
In a large mixing bowl, add the yeast to the warm water and stir to dissolve. If you’re in a hurry, add a pinch of sugar. Add flour one cup at a time and mix with a wooden spoon until well mixed between each cup. It will be difficult if not impossible to incorporate all of the flour with just the spoon. If you’d like, you can add some dried oregano or some finely chopped garlic to the dough after the first cup of flour.

Dissolve yeast in warm water

Dough after 1 cup of flour

After 2 cups of flour

After 3 cups of flour
Flour your work surface liberally and get the dough out of the bowl. Flour your hands. Knead by hand until the dough is smooth and bounces back nicely if you poke it with a finger. If you’ve never kneaded dough before, form the dough into a thick disc, fold about 1/3 over, push away with the heel of your hand, rotate 90 degrees, fold, push, rotate, etc. Add flour anytime the dough seems wet. It will take a few minutes of constant kneading to get the dough smooth and ready to rise. Form the dough into a ball and pinch the bottom together so it’s nice and seamless.

After kneading
Leave the dough on the counter, wash and dry your mixing bowl, pour a tablespoon or so of oil into the bottom of the bowl. Roll the ball in the oil to coat the entire surface. Cover the bowl with a towel and set in a warm place to rise for 20-30 minutes.

Oil in clean bowl

Oiled dough ready to cover and rise
Hint: a little less flour or more water and/or a longer rise time will give you a less dense finished product. If the 1:3 water:flour ratio yields a bread that’s too dense for your taste, try adding a little more water or using a little less flour. With practice you really do get a feel for working with dough.
Form Your Loaf:
16 cloves garlic, either roasted or unpeeled (see recipe)
Salt & pepper to taste
Crushed red pepper (optional)
The oven’s already at 400 degrees. Roll the risen dough onto your floured surface. Flour your hands and knead the dough again. If will get smaller and really stretchy in no time at all. Form into a disk about ¾ to 1 inch thick. It should be about 8” in diameter. Move the newly formed loaf to your cookie sheet or whatever you use to transfer stuff to your pizza stone. If you have a pizza peel, great, use it. If you use the back of a cookie sheet like I do, just as great. If you are cooking the bread on a cookie sheet, sprinkle the cookie sheet with corn meal or cover with parchment paper to prevent sticking.

Dough has doubled in size, ready to punch down and form a loaf
Use your finger to poke 16 holes in the top of the loaf in a 4x4 pattern. If you like more garlic and you have it already roasted, poke the loaf a few more times. You don’t want to poke completely through the dough. Insert a clove of roasted garlic into each hole. Let the dough rise until it’s nearly doubled in thickness. It will practically swallow the cloves of garlic. Brush the entire loaf with the reserved oil from roasting the garlic. If you don’t have a brush, just pour it on there. Don’t be bashful. Season the entire loaf liberally with salt and pepper. Add a light sprinkle of crushed red pepper if you’re into that sort of thing. I like it peppery and very salty.

Loaf with garlic cloves pressed in

Brushed with oil, seasoned with salt, pepper & crushed red pepper
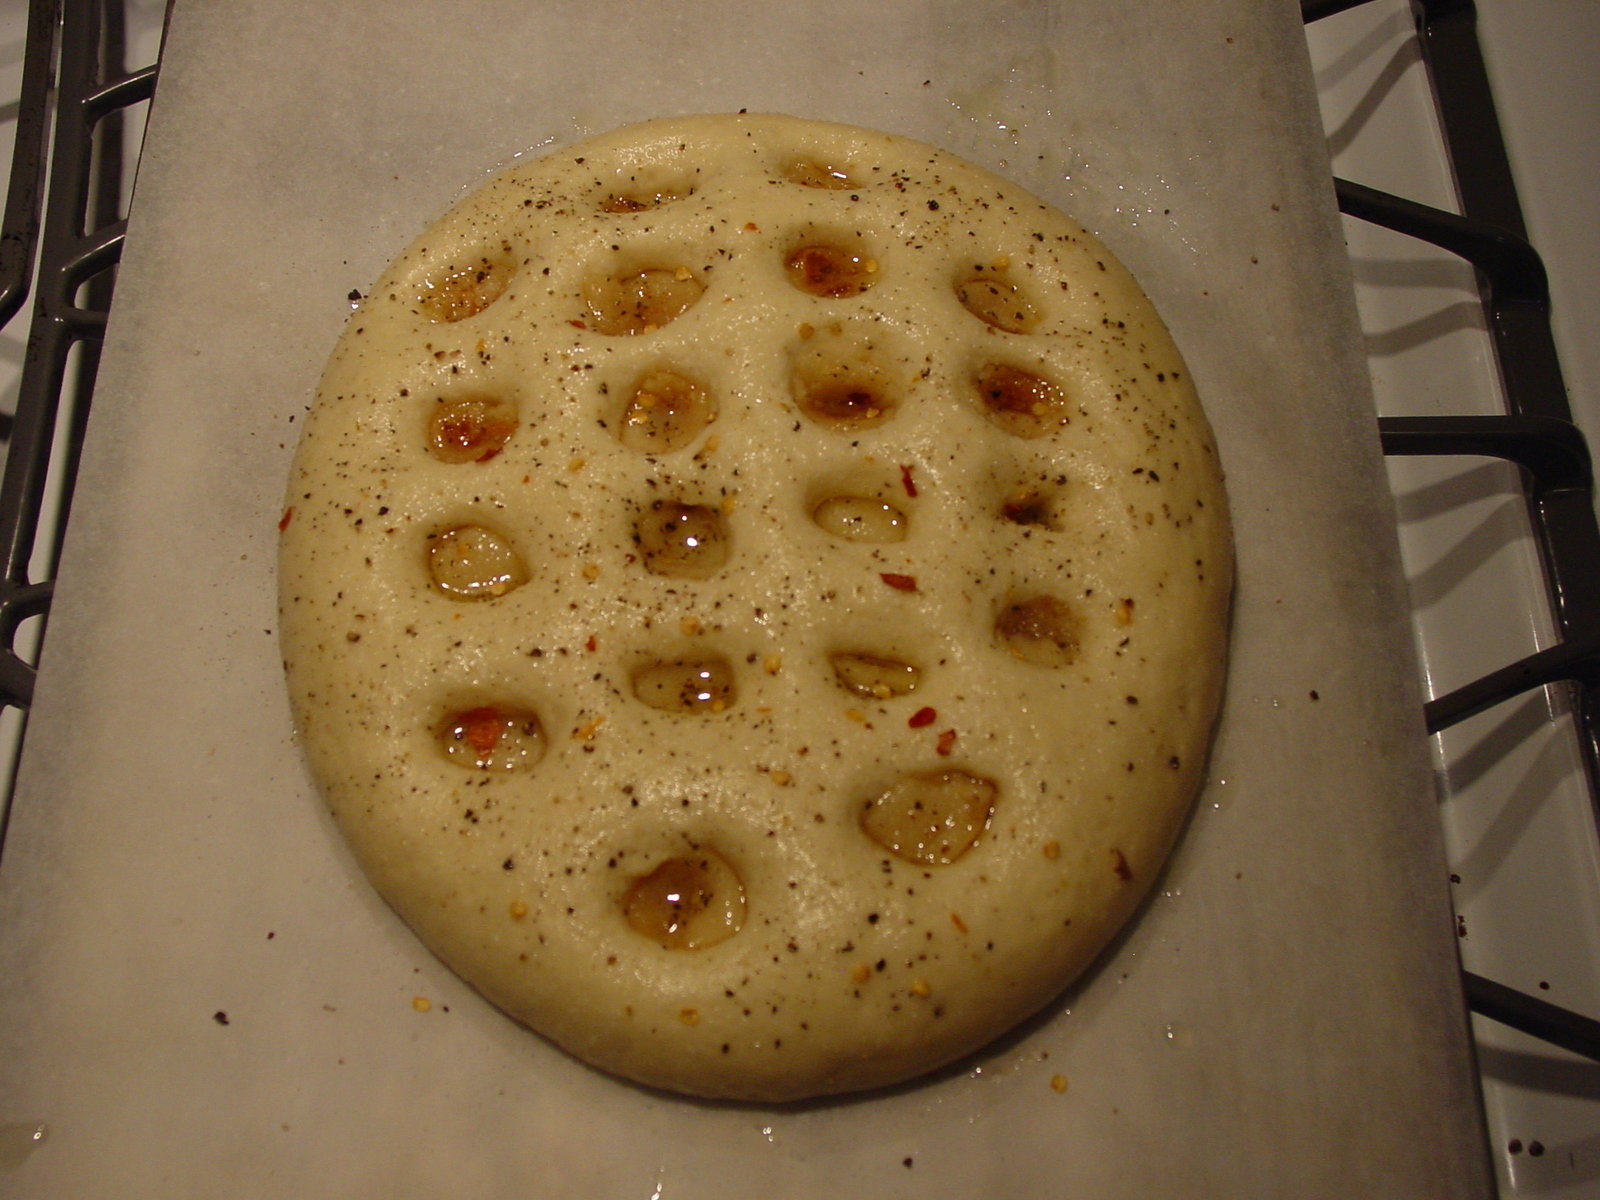
Allow loaf to sit for 5-10 minutes, longer if you want a less dense loaf
Now it’s time to bake your bread. If you’re using a pizza stone and no parchment paper, sprinkle the pizza stone with corn meal. If you have a pizza stone and use it regularly, you probably know the drill. Bake until the loaf is a nice golden brown, usually 20-25 minutes.

The finished loaf - allow to cool before slicing
Time to eat!

The sliced loaf
If my wife had her way, this loaf would have fifty cloves of garlic in it. How much garlic you use is up to you. If the loaf in the pictures, I used twenty cloves. You might be able to tell from the picture of the unbaked loaf that some of the cloves are more done than others—the cloves in the center of the bulb are less done than those on the edges.
I've sliced this bread several ways. Usually I cut individual squares around every clove of garlic. Once in a while I'll cut it into eight wedges like a pizza. For this picture, I sliced across the entire loaf so you could see what it looks like inside. I would not recommend trying to cut slices to serve to people.
My next post will be very different from these first two. I’m going back to the “cooking for one” theme and espousing the wondrous potential of those $5.99 roasted chickens at your grocery store.
Subscribe to:
Posts (Atom)