I found part-time work over Christmas at the local kitchen store. It was in the same shopping center as the music store, so I knew the ladies that ran the place. It was six weeks of work when I desperately needed it and I really enjoyed it. As a Christmas gift, they gave me a copy of Donaldo Soviero’s cookbook La Vera Cucina Italiana: The Fundamentals of Classic Italian Cooking. To this day it’s still my favorite cookbook. It’s a fun book to read, even if you don’t use many of the recipes. I’m pretty sure the book is out of print now.
If you cook much at all, you’ll soon find that you tend to tailor your favorite recipes to your particular tastes—or simply modify them due to a lack or surplus of a particular ingredient. In the case of the recipe below, I started with a recipe from the aforementioned cookbook and did the best I could with what I had at the time. I skipped entire steps, I experimented with the garlic preparation, I let the dough rise a second time. I’ve made this stuff so many times now that I don’t even look at the cookbook anymore. The difference between what I make and what the author intended is enough to make me want to really try to follow the recipe to the letter—but I never have, not even once.
This recipe doesn’t really fit particularly well with my “cooking for one” motif but it’s so good I just had to write it up. It’s an excellent special occasion bread for when you’re having a few friends over for any kind of Italian dinner.
Very Garlic Bread
Synopsis & timeline:
1. Preheat oven to 400 degrees
2. Prepare garlic bulb(s) for roasting, place in oven
3. Make dough
4. While dough rises and garlic roasts, work on some other part of your meal.
5. Remove garlic from oven
6. Punch down risen dough and form loaf
7. Bake finished loaf
Preheat your oven to 400 degrees. If you have a pizza stone, use it. Preheat the oven with the stone inside. If you don’t have a pizza stone, use a cookie sheet. You don’t need to preheat the cookie sheet.
Roasting Garlic
My favorite way to do this loaf is to roast the garlic in the oven. You’ll need at least one entire bulb of garlic, two if they are small. In the end you want at least sixteen whole roasted cloves. Don’t worry about any extra going to waste. It won’t. Reserve any oil used in the roasting process.
You can find plenty of “recipes” for roasting garlic online but really it’s just a matter of chopping off the bottom of a bulb of garlic, placing it cut-side-up in/on an oven safe dish, drizzling it with olive oil and baking it (covered) until the cloves are soft. I usually go with a 400 degree oven and 35-40 minutes, more or less. I usually reserve the tips for chopping—if I’m making garlic bread it’s usually as an accompaniment to a pasta dish, and there’s usually some chopped garlic in my pasta dishes. For this recipe, you might roast your garlic a little rare, since you’ll be baking it again inside the loaf.
Alternately, you can “roast” the garlic on the stove top. Take sixteen (or twenty) unpeeled cloves of garlic and put them in the smallest pan you have. Add enough olive oil to cover about halfway and cook over medium-low heat until the garlic is done—probably ten minutes or so. Remove from heat, remove cloves from oil and allow to cool. Reserve the oil. Once the cloves are cool enough to handle, peel them.
Once you have the garlic in the oven, it’s time to start making the dough.

Garlic bulbs mostly peeled and ready for some oil and some heat.

Garlic "tips" that can be saved and chopped for whatever purpose.

Roasted garlic just out of the oven

Oil from roasting garlic. Save this stuff!
Basic Dough
I use this same recipe for pizza dough. It’s about as simple a bread dough recipe as you’ll find.
Ingredients:
1 C warm water
3 C flour + flour for dusting
1 pkg active yeast (or equivalent)
Olive Oil
In a large mixing bowl, add the yeast to the warm water and stir to dissolve. If you’re in a hurry, add a pinch of sugar. Add flour one cup at a time and mix with a wooden spoon until well mixed between each cup. It will be difficult if not impossible to incorporate all of the flour with just the spoon. If you’d like, you can add some dried oregano or some finely chopped garlic to the dough after the first cup of flour.

Dissolve yeast in warm water

Dough after 1 cup of flour

After 2 cups of flour

After 3 cups of flour
Flour your work surface liberally and get the dough out of the bowl. Flour your hands. Knead by hand until the dough is smooth and bounces back nicely if you poke it with a finger. If you’ve never kneaded dough before, form the dough into a thick disc, fold about 1/3 over, push away with the heel of your hand, rotate 90 degrees, fold, push, rotate, etc. Add flour anytime the dough seems wet. It will take a few minutes of constant kneading to get the dough smooth and ready to rise. Form the dough into a ball and pinch the bottom together so it’s nice and seamless.

After kneading
Leave the dough on the counter, wash and dry your mixing bowl, pour a tablespoon or so of oil into the bottom of the bowl. Roll the ball in the oil to coat the entire surface. Cover the bowl with a towel and set in a warm place to rise for 20-30 minutes.

Oil in clean bowl

Oiled dough ready to cover and rise
Hint: a little less flour or more water and/or a longer rise time will give you a less dense finished product. If the 1:3 water:flour ratio yields a bread that’s too dense for your taste, try adding a little more water or using a little less flour. With practice you really do get a feel for working with dough.
Form Your Loaf:
16 cloves garlic, either roasted or unpeeled (see recipe)
Salt & pepper to taste
Crushed red pepper (optional)
The oven’s already at 400 degrees. Roll the risen dough onto your floured surface. Flour your hands and knead the dough again. If will get smaller and really stretchy in no time at all. Form into a disk about ¾ to 1 inch thick. It should be about 8” in diameter. Move the newly formed loaf to your cookie sheet or whatever you use to transfer stuff to your pizza stone. If you have a pizza peel, great, use it. If you use the back of a cookie sheet like I do, just as great. If you are cooking the bread on a cookie sheet, sprinkle the cookie sheet with corn meal or cover with parchment paper to prevent sticking.

Dough has doubled in size, ready to punch down and form a loaf
Use your finger to poke 16 holes in the top of the loaf in a 4x4 pattern. If you like more garlic and you have it already roasted, poke the loaf a few more times. You don’t want to poke completely through the dough. Insert a clove of roasted garlic into each hole. Let the dough rise until it’s nearly doubled in thickness. It will practically swallow the cloves of garlic. Brush the entire loaf with the reserved oil from roasting the garlic. If you don’t have a brush, just pour it on there. Don’t be bashful. Season the entire loaf liberally with salt and pepper. Add a light sprinkle of crushed red pepper if you’re into that sort of thing. I like it peppery and very salty.

Loaf with garlic cloves pressed in

Brushed with oil, seasoned with salt, pepper & crushed red pepper
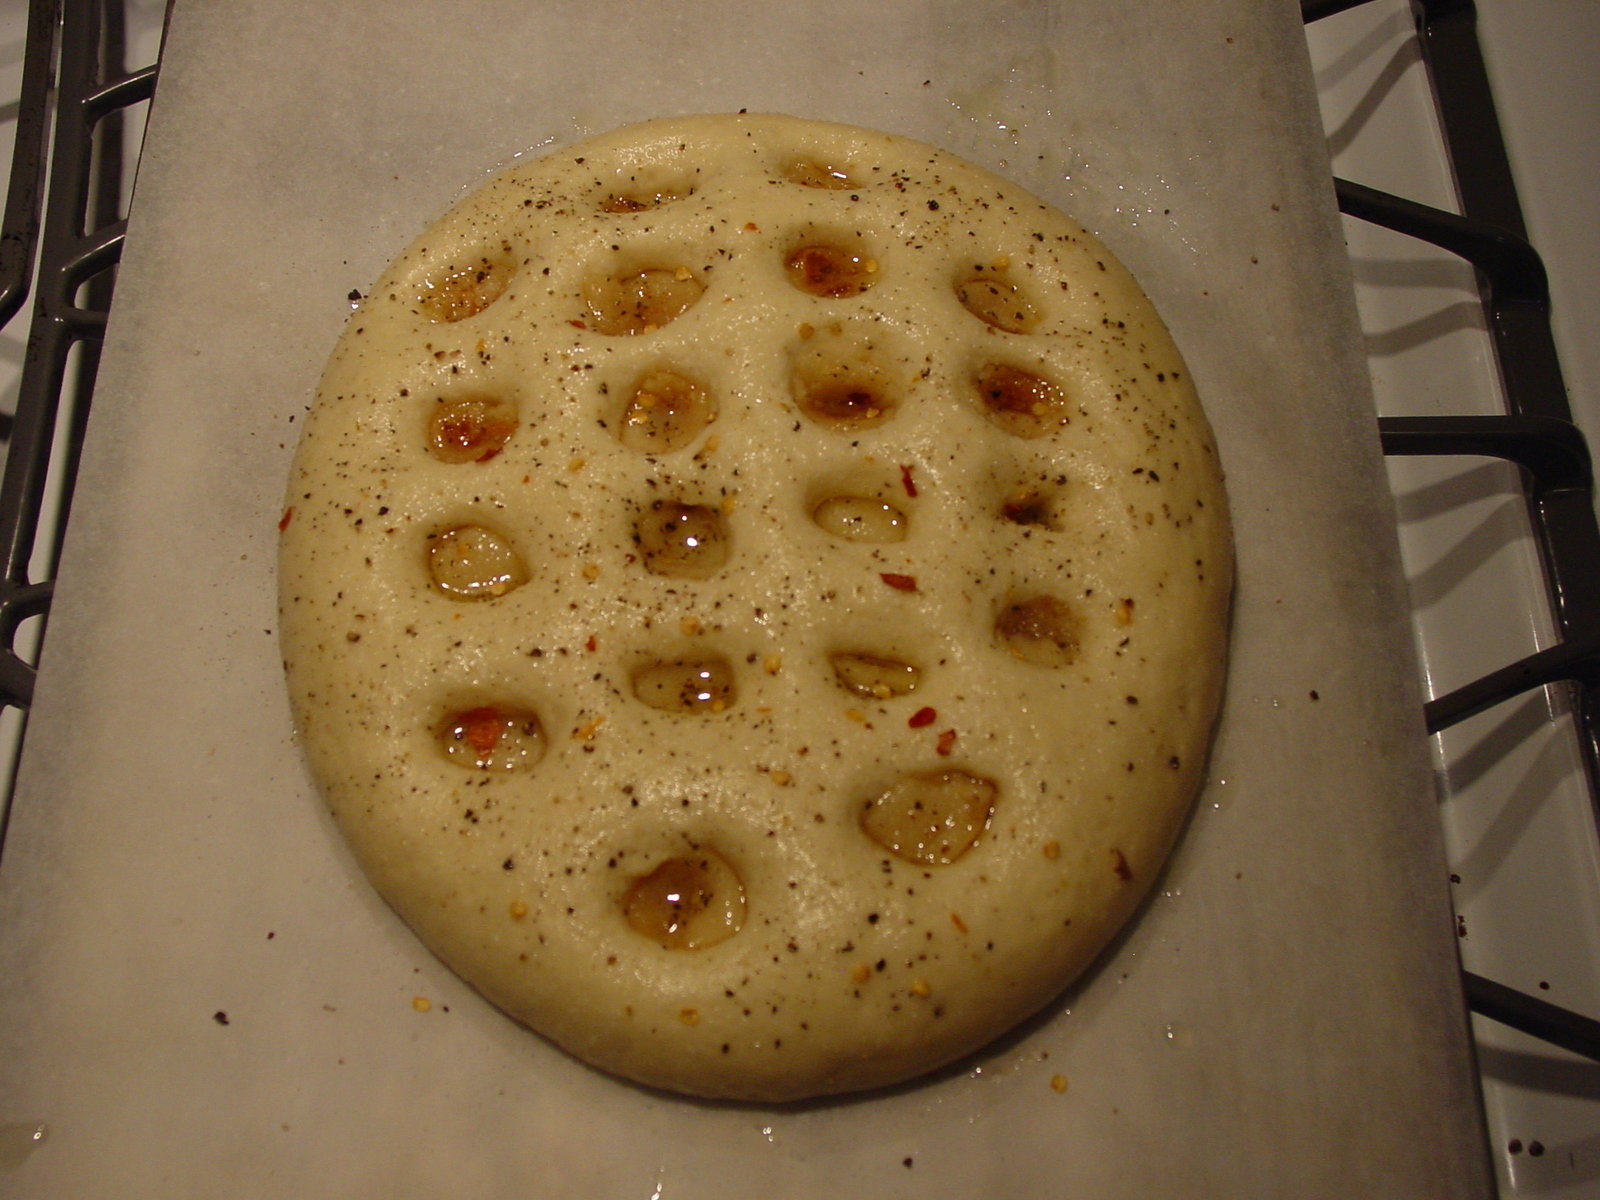
Allow loaf to sit for 5-10 minutes, longer if you want a less dense loaf
Now it’s time to bake your bread. If you’re using a pizza stone and no parchment paper, sprinkle the pizza stone with corn meal. If you have a pizza stone and use it regularly, you probably know the drill. Bake until the loaf is a nice golden brown, usually 20-25 minutes.

The finished loaf - allow to cool before slicing
Time to eat!

The sliced loaf
If my wife had her way, this loaf would have fifty cloves of garlic in it. How much garlic you use is up to you. If the loaf in the pictures, I used twenty cloves. You might be able to tell from the picture of the unbaked loaf that some of the cloves are more done than others—the cloves in the center of the bulb are less done than those on the edges.
I've sliced this bread several ways. Usually I cut individual squares around every clove of garlic. Once in a while I'll cut it into eight wedges like a pizza. For this picture, I sliced across the entire loaf so you could see what it looks like inside. I would not recommend trying to cut slices to serve to people.
My next post will be very different from these first two. I’m going back to the “cooking for one” theme and espousing the wondrous potential of those $5.99 roasted chickens at your grocery store.
No comments:
Post a Comment