Sorry, no time for any amusing tales of poverty or anecdotes this morning.
Crispy Fish. Sounds good already doesn't it? Even better, it's not deep fried. I learned this technique from my brother and have used it with several varieties of fish and it has always been delicious. It's quick, easy and delicious. What's not to love about that?
Start with skinless fillets of whatever fish you like, no more than about 1" thick. Around 3/4" thick is ideal, but even a thin 1/2" fillet can be used. Brush both sides of the fillet with oil and season with salt & pepper. A coarse kosher or sea salt is best, and as always you should be grinding your own pepper. Cut a lemon in half length wise. Cut one half into four wedges and reserve the other half for finishing the fish in the pan.
Place your skillet on medium-high heat, add a little oil. When the pan is hot, place the fish in the pan. If you can identify the skin side of your skinless fillet, place that side down. If you're working with a fillet from a larger fish and can't identify the skin side, don't worry about it.
DO NOT FLIP THE FISH. You will be able to watch the fish cook from the bottom, and you won't want to flip it at all unless you absolutely have to. It won't take any more than a few minutes for the fish to cook. If you're using a particularly thick piece of fish and it's going to burn before it's done, flip it as late as possible.
When the fish is done, finish it in the pan with the juice of the reserved half-lemon. Remove the fillets and place them crispy side up on plates. Serve with a lemon wedge or two.
This fish is as comfortable next to mac & cheese and red beets as it would be with roasted garlic smashed potatoes and peeled asparagus.
I've used local Rockfish, cheap frozen Tilapia, fresh caught Salmon and Steelhead and even Pacific Cod. They all turned out great, and I honestly think that any fish will be delicious when done this way.
Tuesday, March 22, 2011
Wednesday, March 16, 2011
Trash or Treasure? Don't Throw Away That Chicken!
You know those $5.99 roast chickens at the grocery store? I love those things. With a family of three we can usually eat two meals off of one bird and make chicken stock from the carcass that gets used for all sorts of things.
For the single person, you can feed yourself at least 3-4 times off of one bird.
Meal #1 - breast/wing quarter w/starch and veggies as your evening meal.
Meal #2 - lunch the next day. Either eat the other breast/wing quarter whole for lunch (cold or reheated) or chop up the breast and make a chicken salad sandwich. Slice it up and put it on top of a salad. Cut it up and make a cold wrap out of it. Your options are limited only by your imagination and your budget.
Now you have two leg/thigh quarters left in your refrigerator. Take them out, remove the skin and use a fork to shred them. Turn them into chicken tacos/burrito/nachos by heating in a pan with a little oil and some taco seasoning.
If you prefer dark meat, reverse the roles of the breast/wing and leg/thigh quarters.
The carcass can be turned into chicken stock if you're up to it. Simply place the carcass in a large pot and cover with cold water. Add some onion, celery, carrot, a little salt & pepper and maybe some parsley, garlic or bay leaf. Bring it to a boil then reduce to a simmer for a few hours. Remove the carcass and strain. If you want to reduce the stock for a more concentrated flavor, just simmer away uncovered until you get the flavor you want. Once cooled, you can remove any fat and freeze in zip-top bags or even in an ice cube tray. If you use a tray, remove and bag the cubes once frozen. Obviously, if you're eating one of these every week, you're not going to need to make stock out of every carcass.
I'll try to come up with a recipe or ten that utilize this chicken stock in future posts.
In the meantime, don't throw away that chicken!
PS. The next time we buy one of these things, I'll add some images to this post.
Monday, March 14, 2011
Don't Let Anyone Chop Your Garlic
In the summer of 1993 I went to Naknek, Alaska to look for a job on a fishing boat. I found one, but I stepped into an open fish hold less than a week into the season. Hello sprained knee, goodbye fishing job. I went back to Homer and got a job at the local record store. By the time the spring of ’94 rolled around I was managing the place. I loved that job. I got engaged. Kmart opened a store 60 miles up the road in Kenai and sales dropped by a third almost overnight. It wasn’t long before I was an unemployed newlywed. Ugh.
I found part-time work over Christmas at the local kitchen store. It was in the same shopping center as the music store, so I knew the ladies that ran the place. It was six weeks of work when I desperately needed it and I really enjoyed it. As a Christmas gift, they gave me a copy of Donaldo Soviero’s cookbook La Vera Cucina Italiana: The Fundamentals of Classic Italian Cooking. To this day it’s still my favorite cookbook. It’s a fun book to read, even if you don’t use many of the recipes. I’m pretty sure the book is out of print now.
If you cook much at all, you’ll soon find that you tend to tailor your favorite recipes to your particular tastes—or simply modify them due to a lack or surplus of a particular ingredient. In the case of the recipe below, I started with a recipe from the aforementioned cookbook and did the best I could with what I had at the time. I skipped entire steps, I experimented with the garlic preparation, I let the dough rise a second time. I’ve made this stuff so many times now that I don’t even look at the cookbook anymore. The difference between what I make and what the author intended is enough to make me want to really try to follow the recipe to the letter—but I never have, not even once.
This recipe doesn’t really fit particularly well with my “cooking for one” motif but it’s so good I just had to write it up. It’s an excellent special occasion bread for when you’re having a few friends over for any kind of Italian dinner.
Very Garlic Bread
Synopsis & timeline:
1. Preheat oven to 400 degrees
2. Prepare garlic bulb(s) for roasting, place in oven
3. Make dough
4. While dough rises and garlic roasts, work on some other part of your meal.
5. Remove garlic from oven
6. Punch down risen dough and form loaf
7. Bake finished loaf
Preheat your oven to 400 degrees. If you have a pizza stone, use it. Preheat the oven with the stone inside. If you don’t have a pizza stone, use a cookie sheet. You don’t need to preheat the cookie sheet.
Roasting Garlic
My favorite way to do this loaf is to roast the garlic in the oven. You’ll need at least one entire bulb of garlic, two if they are small. In the end you want at least sixteen whole roasted cloves. Don’t worry about any extra going to waste. It won’t. Reserve any oil used in the roasting process.
You can find plenty of “recipes” for roasting garlic online but really it’s just a matter of chopping off the bottom of a bulb of garlic, placing it cut-side-up in/on an oven safe dish, drizzling it with olive oil and baking it (covered) until the cloves are soft. I usually go with a 400 degree oven and 35-40 minutes, more or less. I usually reserve the tips for chopping—if I’m making garlic bread it’s usually as an accompaniment to a pasta dish, and there’s usually some chopped garlic in my pasta dishes. For this recipe, you might roast your garlic a little rare, since you’ll be baking it again inside the loaf.
Alternately, you can “roast” the garlic on the stove top. Take sixteen (or twenty) unpeeled cloves of garlic and put them in the smallest pan you have. Add enough olive oil to cover about halfway and cook over medium-low heat until the garlic is done—probably ten minutes or so. Remove from heat, remove cloves from oil and allow to cool. Reserve the oil. Once the cloves are cool enough to handle, peel them.
Once you have the garlic in the oven, it’s time to start making the dough.


Basic Dough
I use this same recipe for pizza dough. It’s about as simple a bread dough recipe as you’ll find.
Ingredients:
1 C warm water
3 C flour + flour for dusting
1 pkg active yeast (or equivalent)
Olive Oil
In a large mixing bowl, add the yeast to the warm water and stir to dissolve. If you’re in a hurry, add a pinch of sugar. Add flour one cup at a time and mix with a wooden spoon until well mixed between each cup. It will be difficult if not impossible to incorporate all of the flour with just the spoon. If you’d like, you can add some dried oregano or some finely chopped garlic to the dough after the first cup of flour.


Flour your work surface liberally and get the dough out of the bowl. Flour your hands. Knead by hand until the dough is smooth and bounces back nicely if you poke it with a finger. If you’ve never kneaded dough before, form the dough into a thick disc, fold about 1/3 over, push away with the heel of your hand, rotate 90 degrees, fold, push, rotate, etc. Add flour anytime the dough seems wet. It will take a few minutes of constant kneading to get the dough smooth and ready to rise. Form the dough into a ball and pinch the bottom together so it’s nice and seamless.

Leave the dough on the counter, wash and dry your mixing bowl, pour a tablespoon or so of oil into the bottom of the bowl. Roll the ball in the oil to coat the entire surface. Cover the bowl with a towel and set in a warm place to rise for 20-30 minutes.


Don’t bother cleaning up the floured surface—you’re going to need it again shortly.
Hint: a little less flour or more water and/or a longer rise time will give you a less dense finished product. If the 1:3 water:flour ratio yields a bread that’s too dense for your taste, try adding a little more water or using a little less flour. With practice you really do get a feel for working with dough.
Form Your Loaf:
16 cloves garlic, either roasted or unpeeled (see recipe)
Salt & pepper to taste
Crushed red pepper (optional)
The oven’s already at 400 degrees. Roll the risen dough onto your floured surface. Flour your hands and knead the dough again. If will get smaller and really stretchy in no time at all. Form into a disk about ¾ to 1 inch thick. It should be about 8” in diameter. Move the newly formed loaf to your cookie sheet or whatever you use to transfer stuff to your pizza stone. If you have a pizza peel, great, use it. If you use the back of a cookie sheet like I do, just as great. If you are cooking the bread on a cookie sheet, sprinkle the cookie sheet with corn meal or cover with parchment paper to prevent sticking.

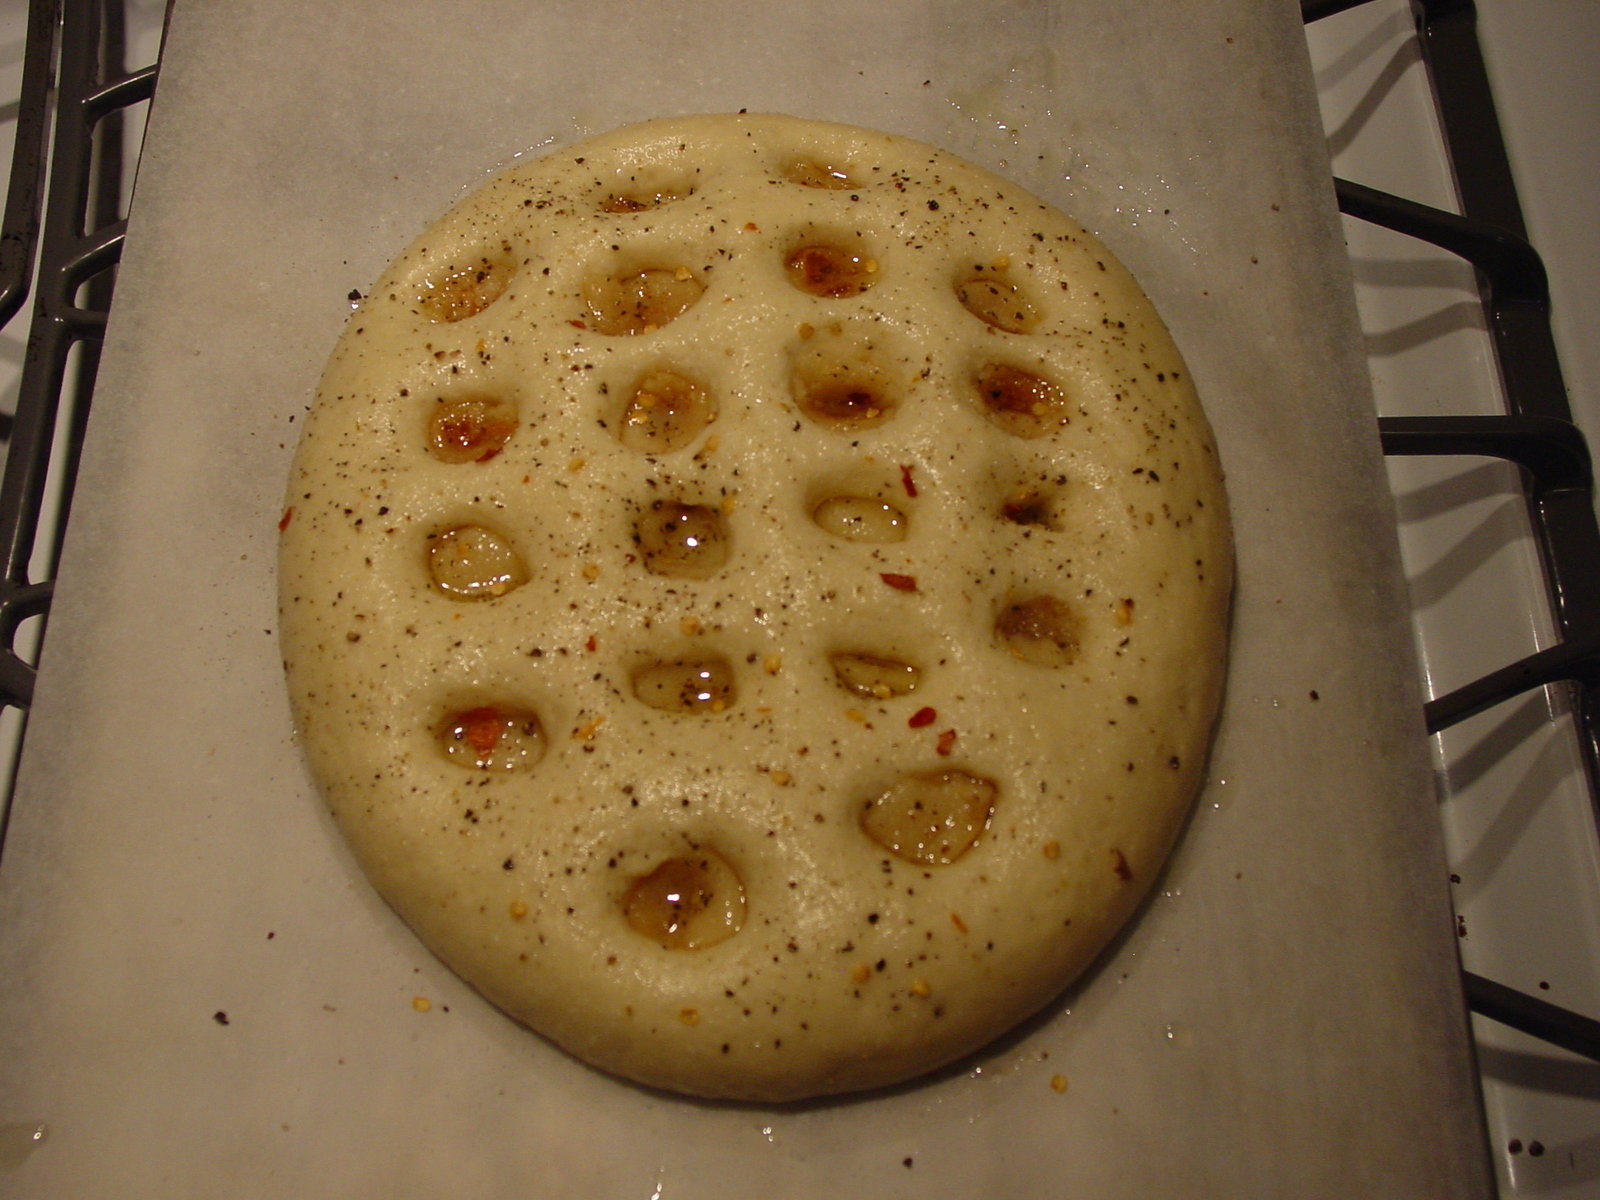
Use your finger to poke 16 holes in the top of the loaf in a 4x4 pattern. If you like more garlic and you have it already roasted, poke the loaf a few more times. You don’t want to poke completely through the dough. Insert a clove of roasted garlic into each hole. Let the dough rise until it’s nearly doubled in thickness. It will practically swallow the cloves of garlic. Brush the entire loaf with the reserved oil from roasting the garlic. If you don’t have a brush, just pour it on there. Don’t be bashful. Season the entire loaf liberally with salt and pepper. Add a light sprinkle of crushed red pepper if you’re into that sort of thing. I like it peppery and very salty.


Now it’s time to bake your bread. If you’re using a pizza stone and no parchment paper, sprinkle the pizza stone with corn meal. If you have a pizza stone and use it regularly, you probably know the drill. Bake until the loaf is a nice golden brown, usually 20-25 minutes.

Time to eat!

If my wife had her way, this loaf would have fifty cloves of garlic in it. How much garlic you use is up to you. If the loaf in the pictures, I used twenty cloves. You might be able to tell from the picture of the unbaked loaf that some of the cloves are more done than others—the cloves in the center of the bulb are less done than those on the edges.
I've sliced this bread several ways. Usually I cut individual squares around every clove of garlic. Once in a while I'll cut it into eight wedges like a pizza. For this picture, I sliced across the entire loaf so you could see what it looks like inside. I would not recommend trying to cut slices to serve to people.
My next post will be very different from these first two. I’m going back to the “cooking for one” theme and espousing the wondrous potential of those $5.99 roasted chickens at your grocery store.
I found part-time work over Christmas at the local kitchen store. It was in the same shopping center as the music store, so I knew the ladies that ran the place. It was six weeks of work when I desperately needed it and I really enjoyed it. As a Christmas gift, they gave me a copy of Donaldo Soviero’s cookbook La Vera Cucina Italiana: The Fundamentals of Classic Italian Cooking. To this day it’s still my favorite cookbook. It’s a fun book to read, even if you don’t use many of the recipes. I’m pretty sure the book is out of print now.
If you cook much at all, you’ll soon find that you tend to tailor your favorite recipes to your particular tastes—or simply modify them due to a lack or surplus of a particular ingredient. In the case of the recipe below, I started with a recipe from the aforementioned cookbook and did the best I could with what I had at the time. I skipped entire steps, I experimented with the garlic preparation, I let the dough rise a second time. I’ve made this stuff so many times now that I don’t even look at the cookbook anymore. The difference between what I make and what the author intended is enough to make me want to really try to follow the recipe to the letter—but I never have, not even once.
This recipe doesn’t really fit particularly well with my “cooking for one” motif but it’s so good I just had to write it up. It’s an excellent special occasion bread for when you’re having a few friends over for any kind of Italian dinner.
Very Garlic Bread
Synopsis & timeline:
1. Preheat oven to 400 degrees
2. Prepare garlic bulb(s) for roasting, place in oven
3. Make dough
4. While dough rises and garlic roasts, work on some other part of your meal.
5. Remove garlic from oven
6. Punch down risen dough and form loaf
7. Bake finished loaf
Preheat your oven to 400 degrees. If you have a pizza stone, use it. Preheat the oven with the stone inside. If you don’t have a pizza stone, use a cookie sheet. You don’t need to preheat the cookie sheet.
Roasting Garlic
My favorite way to do this loaf is to roast the garlic in the oven. You’ll need at least one entire bulb of garlic, two if they are small. In the end you want at least sixteen whole roasted cloves. Don’t worry about any extra going to waste. It won’t. Reserve any oil used in the roasting process.
You can find plenty of “recipes” for roasting garlic online but really it’s just a matter of chopping off the bottom of a bulb of garlic, placing it cut-side-up in/on an oven safe dish, drizzling it with olive oil and baking it (covered) until the cloves are soft. I usually go with a 400 degree oven and 35-40 minutes, more or less. I usually reserve the tips for chopping—if I’m making garlic bread it’s usually as an accompaniment to a pasta dish, and there’s usually some chopped garlic in my pasta dishes. For this recipe, you might roast your garlic a little rare, since you’ll be baking it again inside the loaf.
Alternately, you can “roast” the garlic on the stove top. Take sixteen (or twenty) unpeeled cloves of garlic and put them in the smallest pan you have. Add enough olive oil to cover about halfway and cook over medium-low heat until the garlic is done—probably ten minutes or so. Remove from heat, remove cloves from oil and allow to cool. Reserve the oil. Once the cloves are cool enough to handle, peel them.
Once you have the garlic in the oven, it’s time to start making the dough.

Garlic bulbs mostly peeled and ready for some oil and some heat.

Garlic "tips" that can be saved and chopped for whatever purpose.

Roasted garlic just out of the oven

Oil from roasting garlic. Save this stuff!
Basic Dough
I use this same recipe for pizza dough. It’s about as simple a bread dough recipe as you’ll find.
Ingredients:
1 C warm water
3 C flour + flour for dusting
1 pkg active yeast (or equivalent)
Olive Oil
In a large mixing bowl, add the yeast to the warm water and stir to dissolve. If you’re in a hurry, add a pinch of sugar. Add flour one cup at a time and mix with a wooden spoon until well mixed between each cup. It will be difficult if not impossible to incorporate all of the flour with just the spoon. If you’d like, you can add some dried oregano or some finely chopped garlic to the dough after the first cup of flour.

Dissolve yeast in warm water

Dough after 1 cup of flour

After 2 cups of flour

After 3 cups of flour
Flour your work surface liberally and get the dough out of the bowl. Flour your hands. Knead by hand until the dough is smooth and bounces back nicely if you poke it with a finger. If you’ve never kneaded dough before, form the dough into a thick disc, fold about 1/3 over, push away with the heel of your hand, rotate 90 degrees, fold, push, rotate, etc. Add flour anytime the dough seems wet. It will take a few minutes of constant kneading to get the dough smooth and ready to rise. Form the dough into a ball and pinch the bottom together so it’s nice and seamless.

After kneading
Leave the dough on the counter, wash and dry your mixing bowl, pour a tablespoon or so of oil into the bottom of the bowl. Roll the ball in the oil to coat the entire surface. Cover the bowl with a towel and set in a warm place to rise for 20-30 minutes.

Oil in clean bowl

Oiled dough ready to cover and rise
Hint: a little less flour or more water and/or a longer rise time will give you a less dense finished product. If the 1:3 water:flour ratio yields a bread that’s too dense for your taste, try adding a little more water or using a little less flour. With practice you really do get a feel for working with dough.
Form Your Loaf:
16 cloves garlic, either roasted or unpeeled (see recipe)
Salt & pepper to taste
Crushed red pepper (optional)
The oven’s already at 400 degrees. Roll the risen dough onto your floured surface. Flour your hands and knead the dough again. If will get smaller and really stretchy in no time at all. Form into a disk about ¾ to 1 inch thick. It should be about 8” in diameter. Move the newly formed loaf to your cookie sheet or whatever you use to transfer stuff to your pizza stone. If you have a pizza peel, great, use it. If you use the back of a cookie sheet like I do, just as great. If you are cooking the bread on a cookie sheet, sprinkle the cookie sheet with corn meal or cover with parchment paper to prevent sticking.

Dough has doubled in size, ready to punch down and form a loaf
Use your finger to poke 16 holes in the top of the loaf in a 4x4 pattern. If you like more garlic and you have it already roasted, poke the loaf a few more times. You don’t want to poke completely through the dough. Insert a clove of roasted garlic into each hole. Let the dough rise until it’s nearly doubled in thickness. It will practically swallow the cloves of garlic. Brush the entire loaf with the reserved oil from roasting the garlic. If you don’t have a brush, just pour it on there. Don’t be bashful. Season the entire loaf liberally with salt and pepper. Add a light sprinkle of crushed red pepper if you’re into that sort of thing. I like it peppery and very salty.

Loaf with garlic cloves pressed in

Brushed with oil, seasoned with salt, pepper & crushed red pepper
Allow loaf to sit for 5-10 minutes, longer if you want a less dense loaf
Now it’s time to bake your bread. If you’re using a pizza stone and no parchment paper, sprinkle the pizza stone with corn meal. If you have a pizza stone and use it regularly, you probably know the drill. Bake until the loaf is a nice golden brown, usually 20-25 minutes.

The finished loaf - allow to cool before slicing
Time to eat!

The sliced loaf
If my wife had her way, this loaf would have fifty cloves of garlic in it. How much garlic you use is up to you. If the loaf in the pictures, I used twenty cloves. You might be able to tell from the picture of the unbaked loaf that some of the cloves are more done than others—the cloves in the center of the bulb are less done than those on the edges.
I've sliced this bread several ways. Usually I cut individual squares around every clove of garlic. Once in a while I'll cut it into eight wedges like a pizza. For this picture, I sliced across the entire loaf so you could see what it looks like inside. I would not recommend trying to cut slices to serve to people.
My next post will be very different from these first two. I’m going back to the “cooking for one” theme and espousing the wondrous potential of those $5.99 roasted chickens at your grocery store.
Wednesday, March 9, 2011
Don't Let Anyone Squeeze Your Lemons
I've had this idea for a very long time. The winter of 1992-1993 was my first in Alaska. I was living in a small cabin with no running water and on a very tight budget. I was working 24 hours a week for $10/hour and my roommate was collecting a few hundred dollars a month in unemployment. We ate like kings.
At some point during the winter I had the idea for a book. Something along the lines of "Living Large on Next to Nothing" that would focus primarily on food but would be more than a simple cookbook. We may have been poor but we were having the time of our lives, and on several occasions we sat around and laughed about how happy we were in our poverty.
Some years later my brother Pete said something that has always stuck with me: Don't let anyone chop your garlic, grind your pepper or squeeze your lemons. Pete's a chef - a real, honest-to-goodness chef that has trained in France, cooked professionally in places as varied as Alaska, the Virgin Islands and North Carolina, and is a real genius in the kitchen.
One other piece of wisdom that I heard first from my father but is a widely espoused bit of advice: It's not how much you make, it's how much you spend. While I may not have been saving toward retirement during the winter of '92 I have grown to really appreciate this line of financial thinking. Frugal is not a bad word. Debt might be.
Why read my blog? To attract and keep a mate, of course! What else is there?
All of you young single guys and girls, this one's for you: Learn to cook well and you will be healthier and happier for the rest of your days.
Guys, you may not realize it but ladies like a man that can cook. Whether you are dating a woman that's a Julia Childs clone or one that can burn water, they all like a man that can hold his own in the kitchen. Cooking for yourself - really cooking, not just re-heating a frozen lasagna or boiling some ramen noodles - also helps keep you healthier. By the way, healthy people are attractive people. Cooking for yourself is also a great way to spend less money on food, and one thing ladies really love is a man that's good with money.
Girls, you all know that a man loves a lady that can cook. If you're the kind of young lady that's looking for a husband, don't kid yourself into thinking that the kitchen isn't as important as the bedroom to married bliss. OK, maybe not quite as important, but you get my drift. I'll repeat the same advice I gave the guys: Cooking for yourself - really cooking, not just re-heating a frozen lasagna or boiling some ramen noodles - also helps keep you healthier. By the way, healthy people are attractive people. Cooking for yourself is also a great way to spend less money on food, and one thing guys really love is a woman that's not a spending machine.
I'm going to try to post recipes and ideas that are tailored for the single person. I'll try to keep things reasonably healthy but there will be times that I add cheese to the bacon and laugh maniacally about it. I rarely measure things very closely so most of my measurements will be either guesses or suggestions. Experiment!
So for my first recipe, a simple marinara sauce:
Ingredients
1 can (28oz) Crushed Tomatoes
Olive Oil
1 small onion, chopped
1-2 cloves garlic, crushed and chopped
Basil - 1 Tbsp or so
Oregano - 1 tsp or so
Crushed Red Pepper - one shake
Salt & Fresh Ground Black Pepper to taste
Optional - one finely grated carrot
Chop your onion as coarsely or as finely as you like. Crush the peeled garlic cloves with the flat of your blade before chopping them very finely. If you prefer a sweeter sauce or just want more vegetables, grate your carrot Open your can of tomatoes now.
Place a medium saucepan over medium heat. Add enough oil to lightly cover the bottom of the pan. Add the onion and cook over medium heat until nearly clear. Add the garlic and the spices (if you're using the carrot, add it with the garlic). Cook for a minute or so until the garlic starts getting golden around the edges.
Add your tomatoes and reduce heat to low. Stir well to incorporate your seasoned oil into the tomatoes. Cook over low heat, stirring occasionally, until you reach a low boil. Cover and simmer for a few minutes or just turn off the heat and serve over noodles.
I love to add black olives to this recipe. Add them with the tomatoes and if you really like black olives add a bit of the black olive juice as well. Sometimes I use whole olives, other times I cut them in half lengthwise.
If you're single and you're eating alone, this should make enough sauce to feed you 4-6 times. This sauce freezes well.
Some pasta tips: add a lot of salt (a tablespoon or two) to your pasta water just before you add the noodles. You'll end up pouring most of the salt down the drain with the pasta water but you'll also impart a nice saltiness to the noodles themselves. Don't rinse your pasta. Don't oil your noodles. Return the drained noodles to the pot they were cooked in and stir in a small amount of the sauce. This will help keep the noodles from sticking together.
Next week I'll put up a recipe for the best garlic bread ever.
Subscribe to:
Posts (Atom)