Saturday, July 7, 2018

Chili 2018 - Chile Colorado

I've been competing in a local chili cook-off every year for the last 5 or so years. I have won some awards but never the big one, and am constantly trying to improve my chili recipe(s).

This recipe is based on an article once published on OregonLive.com but long since deleted.

For 2018, I made a Chile Colorado

Ingredients:
10# meat, usually beef but venison or pork could be fine. I used chuck roast in 2018.
2# whole dried chili peppers. California, New Mexico, Guajillo, there are many to choose from. Some are hotter or sweeter than others. Quality is important - you want them dried but still flexible. If they crumble when bent, they're too dry.
2 large onions - the biggest ones you can find, preferably a sweet variety
Water or stock, preferably stock.
Garlic
Salt
Beer

Preheat your oven to 400F.

De-stem and de-seed the peppers.


 Watch for mold. If a pepper is moldy, throw it away

another moldy pepper

Once you have all of the stems and seeds removed, toast the peppers in the oven until fragrant. Do not over cook! If you can smell them with the oven door closed, they are done.

While the peppers are toasting, peel and slice the onions into 3/8-1/2" thick slices.

Remove the toasted peppers from the oven. Turn oven to broil. Char the onions under the broiler:


While the onions are broiling, move the peppers to a bowl and soak in water for 30 minutes

Drain the pepper and discard the water - it will be very bitter. Run the peppers, onions, and sufficient water/stock to make it work through the blender until you have a paste. It may take multiple batches.

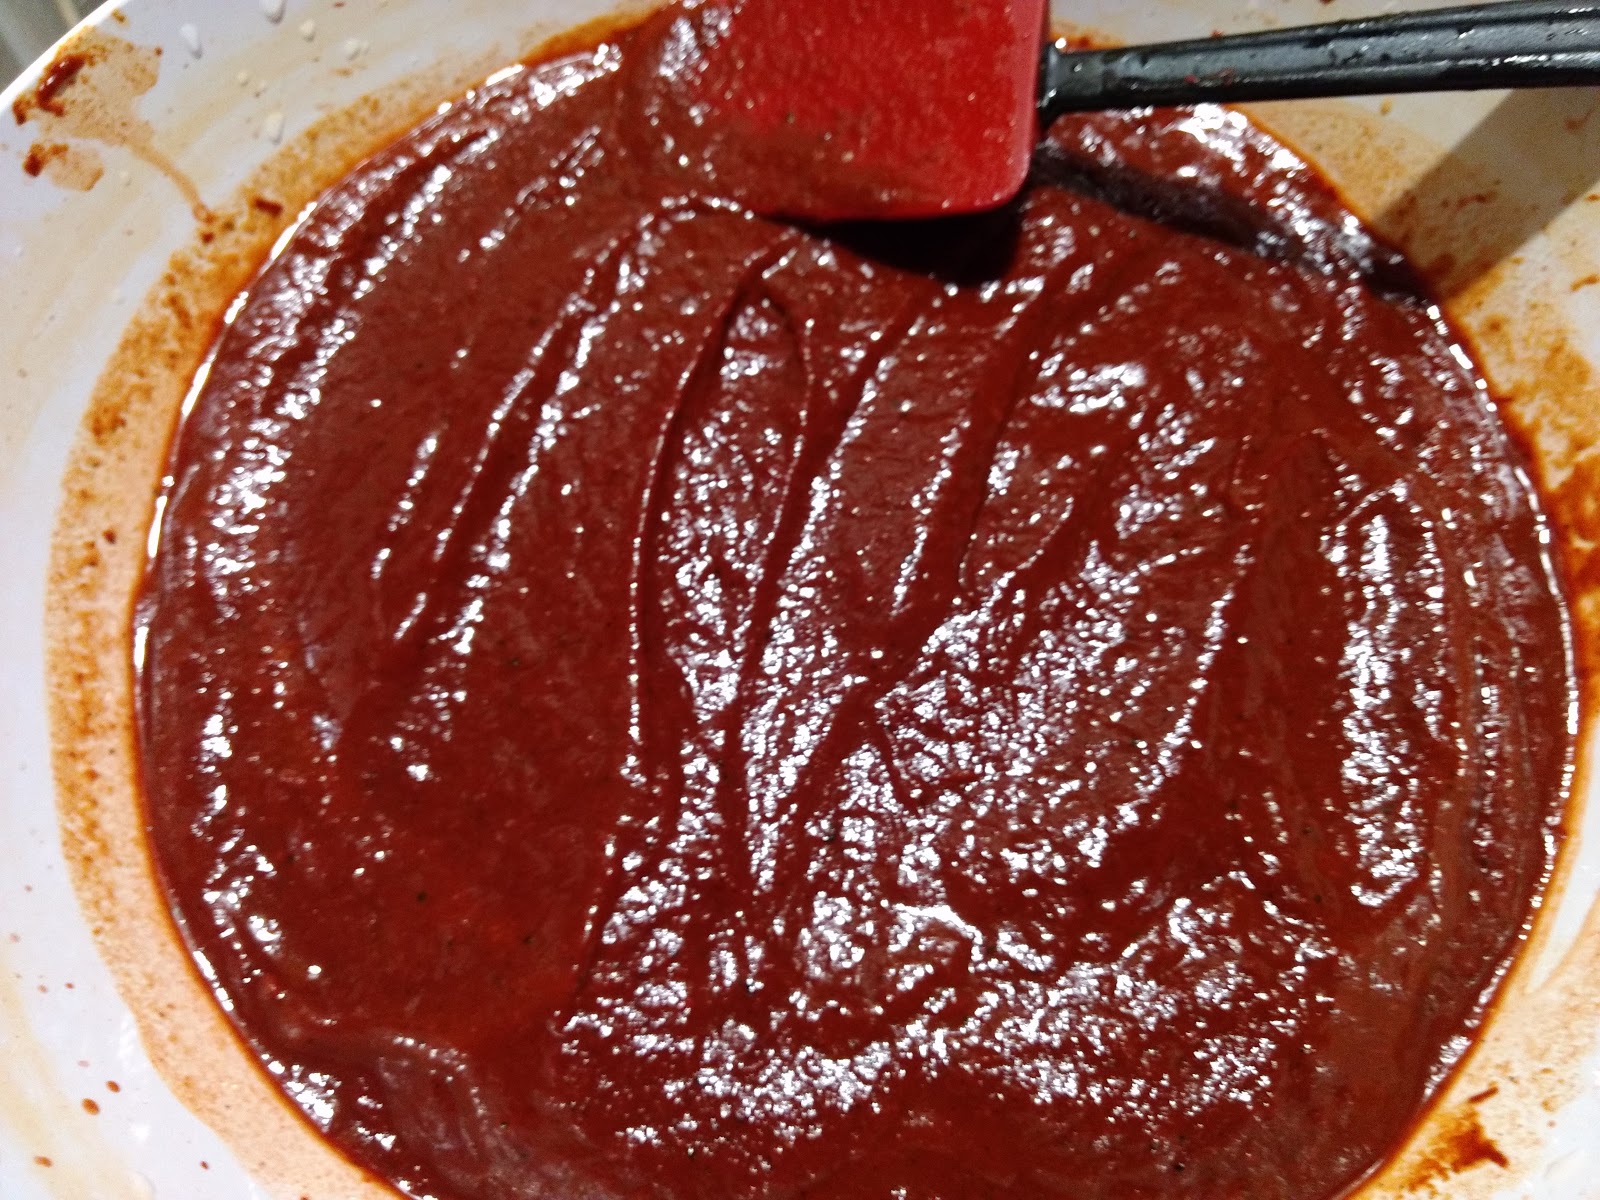
Place the blended pepper/onion paste into a large sieve:

 Force the mixture through the screen with a rubber spatula. This will take some time.
Keep going until all that's left is pepper skin and the occasional pepper seed and all of the paste is through the screen.


I do not have a picture, but there is one more very important step: fry that paste with some oil in a skillet until it changes color and becomes even more fragrant.

Cut the meat into bite-sized pieces and brown in small batches. You want a hot pan, some good color on the meat but not overcooked inside, and not steamed like you get when you put too much meat in the pan. Use the chopped garlic and salt to season the meat as you cook it. No black pepper!


Combine the meat & paste in a large pot, add stock and beer to cover if necessary and simmer for several hours. You want to simmer it long enough for the meat to become very tender.


For those of you that like that American stew often called "chili" consisting of ground beef, kidney beans, stewed tomatoes, onions, and seasoned with "chili powder" from the spice aisle at the grocery store - I have a bonus for you. Make your so-called chili like you normally do then add a cup or so of this magic chili paste. You will never look at chili the same again.

Friday, July 3, 2015

Ultimate Pasta Salad

I love pasta salads. I love pasta in general, but pasta salads are a real summertime favorite of mine. I have been making variations on this same pasta salad for many years and it is very popular with friends and family (or strangers, for that matter) at cookouts and the like.

Disclaimer: I love vinegar. This is a fairly vinegary pasta salad so if you are not into the whole vinegar thing, just cut back on the vinegar or simply look elsewhere for a recipe more suited to your tastes.

Shopping list (stuff you won't have around the house, I promise):
Hard Salami (Genoa Salami is fine) - you have to buy it at the deli counter, ask them for four slices about 1/4" thick. This usually ends up weighing about 1/3 of a pound.

Provolone Cheese (bonus points if your deli has sharp provolone) - get a slice about 1" thick, usually about 1/2 pound. Alternately, get four slices the same thickness as the salami.

Other ingredients:
2 boxes (12oz) rainbow rotini
 - I don't much care for "wacky mac" but if it's all you can find it will suffice.
1 green bell pepper
1/2 red onion
3-4 cloves fresh garlic
1 lemon
1 can (6oz) black olives - I prefer medium
Tomatoes (I buy grape tomatoes and leave them whole - more on that later)
1 C each red wine vinegar and extra virgin olive oil
Salt (Jacobsen Salt Co. Kosher Sea Salt is a personal favorite)
Pepper (freshly ground, please)
Oregano
[optional] Crushed red pepper


Process:
Fill a large pot with enough water to cook all of the pasta at once. Add a generous pinch of salt and a generous pour of oil. You don't want these noodles sticking together and aren't worried about saucing them. Put the pot on a large burner set to high.

While the water heats up, cut the salami into tiny cubes. 1/4" or smaller. You can do the same with the cheese or grate it with a coarse grater. For years I always cut the provolone into cubes but lately have been going with grated and I think I prefer the grated version.

Cut up the bell pepper and onion, using a coarse chop so the pieces are similar to the salami or a bit smaller. I usually chop the onion more finely than the bell pepper.

Chop the garlic finely.

By this time, the water will have come to a boil and you'll have already added the pasta.

COOK THE PASTA VERY AL DENTE. Probably 2 minutes shorter than the shortest cooking time on the package. Drain and rinse with cold water, tossing with your hands to make sure that all of the noodles are cooled. Leave the colander to drain.

Open the can of olives. Drain the can over the noodles. Cut the olives in half lengthwise. If you're in a hurry, a can of sliced olives won't cause a riot.

The tomatoes - I buy the smallest tomatoes I can and leave them whole. If you buy cherry tomatoes and cut them into halves or quarters, nobody will complain. If you want to chop or slice Roma tomatoes, go for it.

Get out a giant bowl. The biggest bowl you've got. Put the noodles into the bowl, followed by everything else except the liquids and spices. Mix well with a wooden spoon or similar. Or use your (clean) hands if you'd prefer.

Add the vinegar first. Mix. Add the oil. Mix. Sprinkle generously with salt, pepper and oregano. Add a very modest sprinkle of crushed red pepper if you're into that sort of thing. Mix well.

Juice your lemon, remove seeds, add lemon juice to bowl and mix one last time.

This pasta salad is best made a day in advance. It may seem too wet at first but give it overnight in the refrigerator and it will be fine.

Presentation considerations:
If you'd prefer to top the salad with your tomatoes, just hold them out until just before you serve then top the salad with the tomatoes. You can do the same thing with the olives.

A small number of green olives can go nicely as well, though they seem much more likely to offend some palates.

Don't be tempted to substitute mozzarella for provolone. Mozzarella is a wonderful cheese but lacks the pungency to keep up with the salami and vinegar in this application.

Any pasta will work, but rotini holds the dressing nicely. In any case, the medium rare cook is important. Pasta that's even close to fully cooked will not hold up very well.

Saturday, May 24, 2014

Jerky!

When my daughter was 12, she went deer hunting for the first time.  The Oregon deer season in our part of the world opens on a Saturday, and unfortunately I had to work that day.  So she went hunting with her grandfather.  Sometime just before noon...

 240 yards, 7mm-08.  Opening Day 2011.
 
When butchering a deer, you always have lots of scraps.  We already had a freezer full of elk burger and didn't want to turn the venison scraps into more burger.  The entire family are also big fans of jerky, so that's what we decided to do with the venison scraps.

I searched the web for some inspiration & ideas regarding marinades then went about making up a marinade with what we had on hand.

Luckily, I wrote it down.  The jerky was excellent.  The only problem was that there was so little of it!  If you ever have wondered why commercial beef jerky is so expensive, a lot of the reason is that four pounds of meat makes little more than a pound of jerky.


Mia's Jerky Marinade:
(enough for about four pounds of meat)
2/3 C Soy Sauce
1/3 C Worcestershire Sauce
1/3 C Black Vinegar (you may need to go to an Asian grocery to find this)
1/3 C Bragg's Liquid Aminos (could probably substitute more Soy)
3 T Garlic Powder
2 T Crushed Red Pepper or to taste - 2 T is noticeable but not particularly hot

Cut meat into thin strips - 1/4" or thinner.

Marinate in ziploc bag overnight or up to 48 hours in refrigerator.

Smoke at 150 degrees for 3+ hours then at 170 degrees until consistency is correct.


You could certainly add more/other flavors.  A lot of folks like a sweet jerky, and for that I'd recommend molasses or honey over brown sugar and brown sugar over white sugar.  Some folks like Teriyaki, or might skip the pepper altogether.  Do what you'd like.  The recipe should scale easily if you want to make larger or smaller batches, though I'd recommend against going smaller.

Saturday, May 3, 2014

Burnt Cheese Omelet with Ham & Onion

Burnt Cheese Omelet with Ham and Onion

Disclaimer: Don't do this.  Really, nobody should ever do this.

My father-in-law came across this technique by mistake one year shortly after Easter.  They had some leftover ham and he wanted to make a ham & cheese scramble for breakfast.  He browned the ham, added the cheese and then got distracted.  By the time he returned to his pan, the cheese had melted completely and burnt on the bottom.  He slid his ham & cheese pancake out of the pan and onto the cutting board, where it cooled for a few minutes while he regrouped.

Then he had an idea...  Let's cut up the burnt cheese & ham pancake into little squares and make a scramble with that?  Somewhere in the universe, a star went supernova at that exact instant.

This recipe will make two 3-egg omelets.

Oil
Small amount of chopped onion
4 oz. Cheddar Cheese
2 oz. Ham
6 eggs

About the onion - I used half of a slice about 3/8" thick, chopped medium-fine.

About the cheese - I used Tillamook Medium Cheddar.  If you have access to this cheese and don't have any in your refrigerator right now, shame on you!  It's the smoothest melting cheddar cheese I've ever seen and is truly the standard by which all medium cheddar cheeses are judged.  A sharp cheddar might do well in this recipe, but I don't know that I'd try anything much more powerful than cheddar.  A Swiss or Provolone would probably be way too strong of flavor for this process.

About the ham - My father-in-law did it right.  Leftover ham cut into small cubes would be perfect.  I used a few slices of Applegate Naturals Uncured Black Forest Ham.  Use what you've got.

About the eggs - I am lucky enough to have a source for fresh eggs.  If you can find them, fresh eggs are so superior to their grocery-store brethren that it's hard to explain to someone that's never had one.  Find a source of fresh eggs if you can.

Ingredients:


Heat the pan over medium heat.  Add some oil.  When the oil is hot, add the onions, cook until they begin to soften then add the ham.  Brown the ham for 2-3 minutes then add the cheese.


Now the important part.  Leave it alone.  Do not reduce the heat.  Do not stir.  You can push the edges back into the mass to form a nice circle and that's about it.  Let if go until the cheese is completely melted and then let it BURN!
When the cheese is melted completely and is starting to separate (one good thing about this process is that you actually remove a lot of fat from the cheese).  When you can break the ham & cheese pancake loose from the pan so that it slides freely as a single unit, flip it over.  It's probably best to do this with the pan, flipping the entire thing like you know what you are doing.
Let the other side burn, too.  When the entire thing slides freely again, lift it out of the pan with a large spatula and place it on some paper towels to absorb some of the fat we've cooked out of the cheese.
Let it cool for a minute or two.  Wipe the pan clean, we're going to use it to make the omelets in a moment.

Chop the burnt cheese into bite-sized squares.


Now make your omelets.

 Finish with freshly ground black pepper.  You won't need any salt.

And there you have it, a burnt cheese omelet.  It might actually be better (and certainly easier) as a scramble than an omelet, especially if you were going to serve it to more than two people.

Once again, no sane person should ever do this.

PS.  If you have leftover bits of burnt cheese, they should keep in the refrigerator for up to a week.

Monday, July 23, 2012

Bruschetta! A Light Summery Version

It's been too long since I posted anything here, and for that I am truly sorry.  I enjoy the blog and hopefully my paltry readership does too.  So I've got a couple of things to write about and I'm going to try and get them up over the next few weeks.

First, I'd like to talk about bruschetta.  Some folks think of bruschetta as a specific dish - it is not.  Bruschetta can be prepared in a tremendous variety of ways and I've yet to meet one that was not delicious.  Some folks like the bread heavily charred, others barely toasted.  If you search the web for bruschetta recipes, you'll find thousands.

Today I have for you a very light bruschetta recipe (and I use that term loosely here) that goes very well with summertime backyard fare.  It's something you can take to a party and not worry about having to bring home any leftovers.  The inspiration for this dish was an appetizer at The Schooner in Netarts, Oregon.  They haven't served it for years and they served several variations over the years that they did serve it.

What you'll need:
Bread - in this case, a baguette is perfect.  The smaller the diameter of the slices, the better.  Two baguettes is better than one.

For the tapenade:
3-4 Roma tomatoes
4 cloves fresh garlic
13 Calmata Olives
Fresh basil - see picture, I have no idea how to measure this stuff
Olive oil (extra virgin, of course)
Kosher salt (any coarse salt will do)

You can toast the bread however you'd prefer.  I've tossed slices in a skillet with some olive oil and simply toasted one side.  I've taken the whole baguette and sliced it lengthwise then toasted the two halves over a charcoal grill before chopping into inch-and-a-half long pieces.  How you toast the bread is up to you, and on occasion I've even served it on fresh bread (not toasted).  Serving it on fresh bread would not technically be bruschetta, but it's still a tasty appetizer.

Chop the garlic finely.
Place in bowl and cover with oil:
Chop the olives finely:

A word about fresh basil.  The grocery stores here sell large bags of fresh organic basil that are usually more than you'd use in a single meal.  The best way to store the unused portion is to cut the stems underwater and leave them near a window.  They'll often sprout roots and thrive for weeks.

Add the olives to the bowl and chop some basil:

Add the basil to the bowl.  You many need to add a little more oil to cover everything.


Now you've got a decision to make regarding the tomatoes.  You can chop them up and add them to the tapenade or slice them thinly and leave them on the side.

When I took these pictures, we served the tomatoes on the side and used fresh bread.  By this time I had forgotten about taking pics for the blog.  I remembered at the last minute...

Sorry about the casual setting.

To serve: take a piece of bread, top with a slice of tomato, a dollop of tapenade, a sprinkle of salt and enjoy!


Tuesday, October 11, 2011

Jerky! Salty, Smoky, Delicious Homemade Jerky

My daughter was lucky enough to kill her first deer on October 1st.  The lucky girl and her not-so-lucky prey:


On Sunday afternoon we butchered.  We have lots of ground Elk from last fall in the freezer, so we didn't want any more ground venison.  We cut steaks where appropriate (hello, back strap!) and cut the rest into thin strips for jerky.  What little we had left that wasn't fit for jerky we cut into small pieces and canned.

None of us had ever made jerky before.  My father-in-law has a propane smoker, and I've got Google.  I searched for jerky recipes and found lots of information.  After comparing a few recipes and processes, we decided on the following:

2/3 C Soy Sauce
2/3 C Worcestershire Sauce
Garlic Powder
Crushed Red Pepper

This was supposed to be enough for three pounds of raw meat.  I had four...

I poured the 2/3 C Soy Sauce over the meat, then emptied the Worcestershire bottle into the 1/3 C measure.  Out of Worcestershire, I substituted 1/3 C Bragg's Liquid Amino and added 1/3 C Black Vinegar (one of those stir fry secret ingredients - highly recommended).  I did not measure the Garlic Powder or Crushed Red Pepper, but I'd estimate 3 T Garlic Powder and 2 T Crushed Red Pepper.

i mixed it  up well and let it sit in the refrigerator overnight, mixing before bed and first thing in the morning.

The next day, we fired up the smoker.  We smoked at 150 degrees for about three hours with some Mesquite chips.  After the three hours were up, the flavor was excellent but the texture not quite as dry as we wanted.  We raised the heat to about 170 and let the jerky dry for another two hours or so.

The end product was fantastic, if a little spicy.  If you remove any red pepper seeds from the jerky, the spice level is nearly perfect.  If you want a little more heat, leave that red pepper in place.

I did not have high hopes for this project, and didn't take pictures or plan to use this recipe here.  I will take a picture of the finished product and add it to this post later tonight or tomorrow.

If you're going to try making jerky at home and don't have a young deer to process, I think I'd recommend using an eye of round roast, cut with the grain into thin strips (1/4" or thinner).

Keep in mind that you lose A LOT of weight with drying.  Our four pounds of raw meat probably lost 50% or more of the total weight by the time it was done.  Jerky is expensive for a reason!

If you have a smoker, I encourage you to try making some of your own jerky.

Thursday, September 22, 2011

Summer's Over - Lots to Come this Fall!

My busy summer is finally winding down and I've got lots of good stuff to share this Fall.

A few weeks ago, we took a trip to Banks, OR, and picked about 20 pounds of cucumbers for making pickles. My mother-in-law has a truly fantastic recipe for dill pickles, and she turned the entire 20 pounds into quarts of dill spears for us.  If I haven't mentioned how much I love my mother-in-law here, I probably should have.

But wait, it gets better.  A week before the cucumber adventure we went to Silverton, OR (just south of Salem) and picked pears in the front yard of some of old friends of my in-laws.  They had five pear trees (not sure of exact species), two of which were "winter pears".  I don't know how many pears we picked, but it was enough to fill the back of a pickup with produce boxes full of them.  We had to wait a while for the pears to ripen, then we all spent a Monday canning pears.  85 quarts.  Eighty five!  And we had plenty left over for several pear crisps (excellent, of course) and some fruit leather (pear puree mixed with reduced home-canned concord grape juice).  I'm not sure exactly what we'll do with so many canned pears, but you'll probably get a first hand look right here before too long.

Today, my in-laws are once again in Banks picking up our tomato order.  150 pounds of vine-ripened tomatoes - 50 pounds for them, 100 pounds for my house.  We plan to can them all.  With an average of 2.5 to 3 pounds of tomatoes per quart, we should get about three dozen quarts of canned tomatoes.  That's about a year's worth at my house.

I'm out of home canned tomatoes right now, but not too long ago I had plenty and this is one of the things I did with them:

Meatballs!

I started with six pounds of ground meat.  In this case, I had two pounds each of ground veal, ground lamb and ground chuck that was ground at home:
(only half of the meat is pictured here)

I added one egg per pound of meat, along with an entire bulb of garlic (finely chopped) and some spices (oregano, basil, crushed red pepper, kosher salt & fresh ground black pepper:

Mix well:

Form meatballs and brown in a little olive oil:

Turn the meatballs to brown on all sides, add more as space permits:

Six pounds of browned meatballs:

Deglaze the pan with some red wine:

Add some onions:

Add the tomatoes - I used three quarts of home-canned tomatoes that I turned into a puree/sauce with a stick blender:

Ready for noodles:

I served this over linguine, and it was delicious.  I served the entire office meatball sandwiches the next day, and everybody loved them.

You can use whatever meat you have, but I'd advise against using 100% beef.  I made a four-pound batch last week and used three pounds of ground elk (about 10% beef fat) and one pound of ground pork.  They were also delicious.  I served meatball sandwiches again at work, and they were very well received.

I will be taking pictures during the tomato canning process, and will make a post here with all the details...